- Continue Shopping
- Your Cart is Empty
Bringing Making Out of the Makerspace: Part I
* This is an excerpt from a presentation I made at Maker Faire, in San Mateo, on May 18 called "Bringing Making Out of the Makerspace". I'll be posting excerpts from that presentation this summer. *
Here's the scenario. I've got 30 kids, and 50 minutes. I need to engage their attention, teach them something new, and build confidence. I want to help as many of these kids as I can find their "inner maker" and I want leave them wanting more.
How?
We use open ended ended projects that light up, move or seem a little bit "dangerous". I like the projects we're working with because they inspire a mix of "I can do that!" and "I get to do that?". We use conductive paint and conductive thread to make electro cards, quiz cards and soft circuits and more. We use dc motors and vibration motors to make doodling robots and buzz bots. And, my favorite, we wear safety glasses and use tools to take things apart.
Open Ended Projects

- What I provide - very boring.
The goal at the end of the class is to come out with a successful project. But a project they they own. For the kids to be successful, the project has to fit within certain constraints – what they know and what they're learning, and what they can do in the amount of time that they're given. For any given project I provide a basic structure of materials, components, tools and techniques. But the kids put it together and fill it in. In this example here we're working with a basic circuit, conductive thread, LEDs and duct tape. I provide the parts, the "how to build a circuit", and the "velcro" switch – they kids do what they want with it. What they know is working with duct tape, what they're learning are basic circuits and switches, and given that and about an hour – they can usually come up with something pretty cool.

- The much cooler end results.

Age Appropriate
What is an age appropriate project? I think anyone who's worked with kids and maker projects will tell you, it's not about the age, it's about the kid. Different kids have different abilities. I hate to turn down anyone based on age. I will ask a parent to stick around and help. When I'm going into a classroom – there are a couple of different variables I consider. Always, vocabulary. This is a battery. This is an LED. This is an open circuit. This is a closed circuit. Give them the words they need to communicate. When giving instructions – consider their age and how new they are to this kind of activity. On one end of the spectrum you've got step by step instructions with everyone working together. On the other end, you're giving them a set of requirements that have to be met. Theory is important. Don't think they are too young! I had a grade 1 student explain circuits to me based on a Magic School Bus episode he had seen. And what you're working towards with the older kids is a quick review of theory with limited instructions. The last variable I consider is prep work. I try not to prep too much. Depending on how much time we have, I will strip wires, I definitely will thread and knot needles. I try not to assemble circuits. I'd rather walk them through testing their circuit instead. Is your LED in correctly? Let's test it.

- I like pizza too!

Do I even need a sample?
No. Definitely not. The younger kids need a sample. But depending on the age of the kids (say grades 4-5-6), and how they are working together, I try not to provide one. This can meet with absolutely excellent results. It can also be met with out and out frustration. Emphasize collaboration. Monitor closely for frustration. Some kids will thrive, some kids won't. But you want everyone to have some level of success.
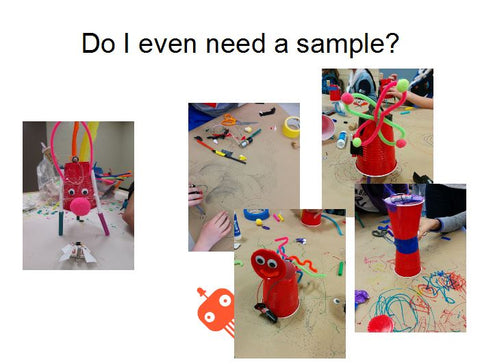
- Pictures of doodling robots created with a sample and without.

These pictures are examples of the doodling robot project, with a sample, and without. This was a mixed Grade 5/6 class, and my first time working with them. I love this one here – he actually cut 90% of the cup away to get the marker to spin from the motor. It's drawing, he's not touching it – it met the constraints.
* The next post in the series is here, Part II. *