- Continue Shopping
- Your Cart is Empty
Go-Car Challenge: More things to do with motors!
* This is an article I sent out in our March Maker Club newsletter. Have you signed up for our newsletter yet? It comes out monthly with news, events and project ideas. You can sign up for our newsletter here: http://eepurl.com/GMbrX *
|
|

|
Bubble Maker Challenge: What else can I do with a motor?
One of the first projects we start our makers off with is the Doodlebot. Also known as a scribble bot or an art bot, this is a fun project that uses the wobbly motion created from offsetting a motor to create fun doodles. But what else can you do with an Educators Pack of Doodlebots?

View full article →
New! Our kits are now available at Creatron
This banner is so much fun!
Creatron has been our favorite go-to store for electronics for years. When we visit Toronto we always try to make a trip to the downtown location. The last time I was there I was excited to find all sizes of LEDs displayed in a rainbow of colors! It's so great to have a store that gets how we work.
We were excited to meet with the Creatron folks at Maker Festival this year in Toronto and at Ottawa at Maker Faire! We thrilled to announce that Maker Junior kits are now available at Creatron.
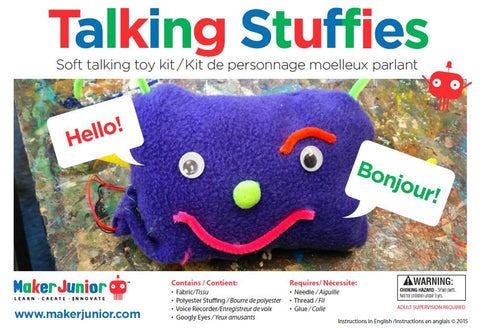
Spooky October Sweepstakes
Win a Talking Stuffie kit in our Spooky October Sweepstakes! Leave a comment on our blog for a chance to win.
Back to School Sweepstakes!
Happy Back to School! It's a new school year and to celebrate getting back into the classroom and back into routine we are giving away an Educators Pack of our BlinkyBot kits.


Our Educators Packs come with enough material for 10 BlinkyBots, including felt, googly eyes, batteries, conductive thread and LEDs. Also included are our easy to follow instructions (in English and in French) and our Workshop Tips. Our Workshop Tips have been developed after hours of hands-on testing with multiple age groups. They include practical logistics and great workarounds for younger students. We want everyone to be successful with their first projects!
Our contest is open to all residents of Canada (except Quebec) and the US over the age of 18.
To enter, leave a comment on our blog telling us how you will use the Educators Pack. The winner will be chosen at random and must be able to correctly answer the following skill-testing question:
What does the L in LED stand for?
Contest closes September 30th, 2015 at midnight.
For more chances to win, share this post on social media and email me the link!
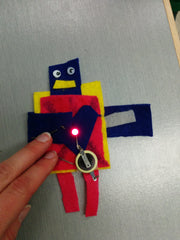
Quiz Cards: What happens next?
I love Quiz Cards. They are such a simple project. It's a simple circuit with an LED that lights up when you pick the right answer.
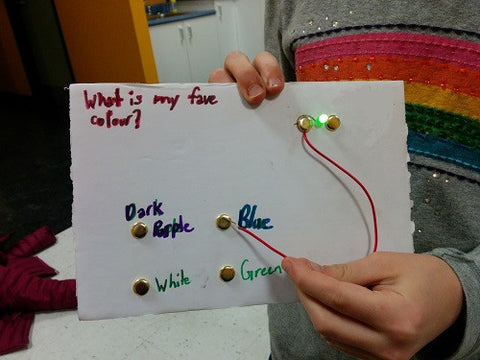
I first introduced them to a group of 9-12 year olds. They had a blast! They quickly figured out how to change the correct answer and had a great time making what they called "troll" questions. I was thrilled. By changing the circuit to change the answer, they were demonstrating a great working knowledge of circuits.
Then they wanted to add a red light. This consistently comes up in every group I work with. Now that they have the green light working, how can they add a red light for a wrong answer. No problem - I always have red LEDs on hand so the kids who finish first can give this a try. It's a bit tricky. And I don't hand out extra batteries to make it work. That's always the first request that comes up. (BTW I've tried conductive tape with this - I like conductive thread better. It's easier for the kids to change their answers.)

When I started introducing this project to the younger kids, ages 6-8, again I was surprised. Yes, it was harder to knot the conductive thread on the battery. (HINT: Practice tying knots first. I usually bring a ball of yarn and we practice tying knots before we start working.) But I almost never had to help with the circuit itself. They figured how to get it working themselves. For this age group, the circuit is a lot easier than writing the question.

We started off the latest session of the GNAG Inventors Workshop for 9-12 yr olds making Quiz Cards. But a couple of weeks later, I put in two weeks for Game Design. I gave them a few weeks notice that it was coming and a few of them started working on designs. For the games, they could use batteries, red or green LEDs, and buzzers. A few of them started working on Operation-style games. And I also had a few really cool light up games.
This first one is called Help Me. The original idea was to have a person behind the board lighting up the different LEDs. Depending on which LED was lit, the player needed to come up with a cure for an ailment.


But we wanted to automate it. We didn't want to have someone hiding behind the board. So we came up with this. We made a circle of connections to the LEDs with paper fasteners. Then we cut out a circle of cardboard and made one slice of it conductive. (Yay, tin foil!) Then we connected the battery to the conductive "slice". Now when you spin the wheel, different LEDs light up.

This next game blew me away. This was one of the kids who started planning early. There are 12 green LEDs and 4 wire leads. One 3V battery. Not to mention imagination, dedication and focus. It all works exactly as expected.

Yes - the tinfoil is part of the circuit too! Pretty impressive.
All of this was inspired by one simple project. Want to get started? You can pick up a Quiz Card kit in our online store. They're also part of the Makers Workshop. Contact me directly if you need enough for a class - I have bulk pricing for educators.