- Continue Shopping
- Your Cart is Empty
Go-Car Challenge: More things to do with motors!
* This is an article I sent out in our March Maker Club newsletter. Have you signed up for our newsletter yet? It comes out monthly with news, events and project ideas. You can sign up for our newsletter here: http://eepurl.com/GMbrX *
|
|

|
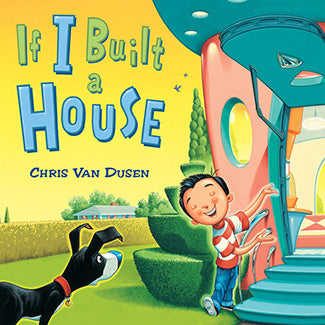
If I Built A House: Sparking Creativity with Kids
Sometimes I like to start my workshops with books that spark creativity. "If I Built a House" by Chris Van Dusen is one of my favourites.
Bubble Maker Challenge: What else can I do with a motor?
One of the first projects we start our makers off with is the Doodlebot. Also known as a scribble bot or an art bot, this is a fun project that uses the wobbly motion created from offsetting a motor to create fun doodles. But what else can you do with an Educators Pack of Doodlebots?

View full article →
It's All About The Space: What Works When You're Making With Kids
We can make any space work, but some spaces I like better than other. Over time I've definitely come up with a list of things that work. Read more for my favourite room features when working with kids.

Halloween Hoodies
Nanik and Hari's latest video is a DIY Tutorial on making your own Halloween costume out of a hoodie. I love making Halloween costumes!
View full article →
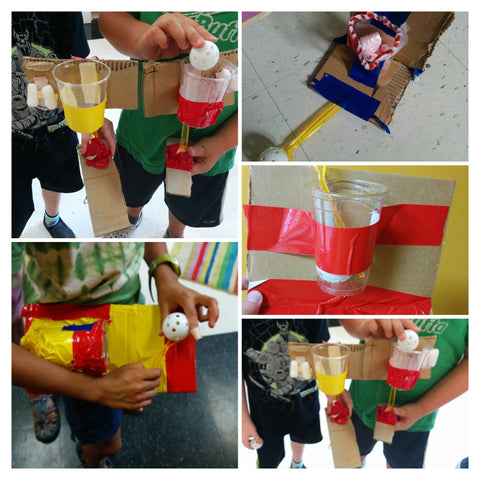
Summer Camp: Cardboard Arcade Challenge
One of the things we did at camp this summer was a cardboard arcade challenge.
Early in the week, the 9-12 yr olds watched the Caine's Arcade video. This is a great video. Out of 4 camps worth of kids, only one of them had seen it before!
We spent the next couple of days working on various projects with motors and LEDs. I encouraged the kids to work on their plans for the games. Our camp was two 1/2 day sessions. One group was 9-12 years old, the other 6-8 years old. While I spent a 1/2 day making with one group, the others were out doing recreation activities with two awesome GNAG counselors. For the cardboard arcade challenge, the idea was for the older kids, the 9-12 year olds, to make the arcade games and host an arcade for the younger kids.
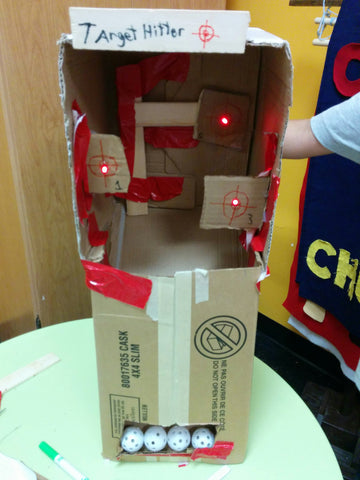
I was totally and completely blown away by the complexity of the games and how much care they took setting everything up.
I was primarily focused on making the games. And the games were impressive. We had water games, pinball games, ball throws, basketball games. Even spinning games of chance! The kids worked with rubber bands and angles and levers to get the movement they wanted. Some of them started introducing the tech we were working with earlier in the week.
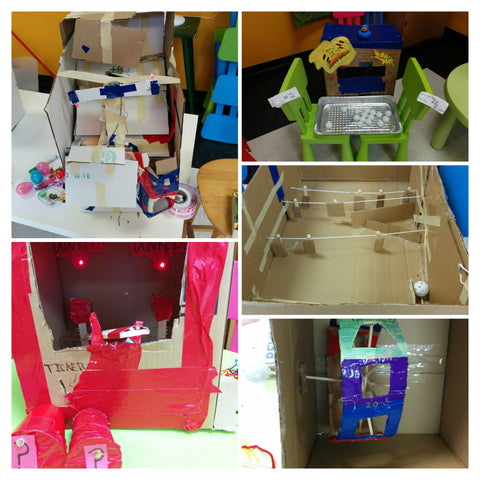
The games were awesome. But so was the prize table! The kids who were done their games first made prizes to give away to the little kids. They set up a structure and some rules about prizes, and even made tickets. (The second week I brought tickets in - mistake! It's more fun to make your tickets.)

The younger kids made games too. We watched Caine's Arcade and they spent a shorter amount of time working on their games. Some games were simple - a cup, a spoon, and a ball. Some games got really complex. Motors were very popular!
What I didn't expect was how long after camp the activity would stick with them. My first hint was this tweet:
Today's viewing of @CainesArcade at @GNAG_Ottawa's @maker_junior camp inspired boys to make our dog a new doghouse! Stay tuned.. #makered
— Allison Burnett (@OrgChaos_allibu) August 21, 2015
Which was followed by:
@maker_junior @CainesArcade @GNAG_Ottawa Our dog quite likes his new digs! #maker pic.twitter.com/Ed0pACbS3u

— Allison Burnett (@OrgChaos_allibu) August 22, 2015
And then I started hearing about Will's Arcade. Will was one of the older kids in the 6-8 year old camp. He's attended a few workshops with me before and exhibited his work at the GYA Science Hack we took part in. When Will's mom started emailing me a couple of weeks ago with pictures of Will's Arcade, I wasn't that surprised.
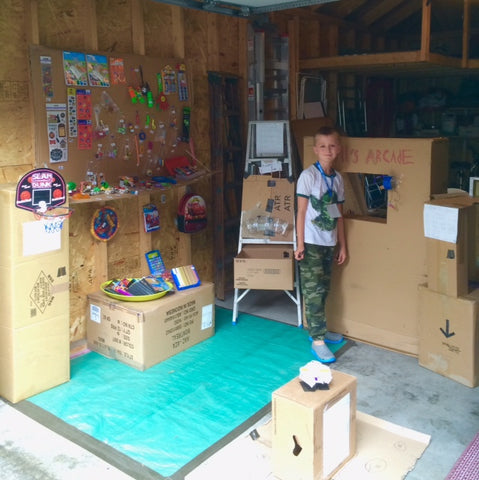
But the cool thing was, he kept going! Will's has now been working on his arcade since camp, six weeks. He has it open on the weekend for customers. And he's made enough money to refill his prize wall - twice!
The only problem is - it's getting colder. And soon Will's Mom and Dad are going to need to use their garage for their car.
Awesome job, Will!

The 2015 Global Cardboard Challenge is October 10. You can find out more about the challenge, the Imagination Foundation, and what's going on in Ottawa that day at their website.
Focus and Dedication: A Multi-week Inventive Effort

This is one cool invention. The inventor has taken the GNAG Inventors Workshop for several sessions. This session, instead of following along with the usual projects, this young inventor took the materials from each project and added on to this creation. Here's a breakdown of the features and what projects they come from:
- Storage compartment access flap (around the back) has a circuit "puzzle" on the back that both lights and buzzes when successfully completed. This is from two projects, Quiz Cards and Design Your Own Game.
- Voice recorder that captures and records instructions is hidden under the nose. This is from the Talking Stuffie project. As is the design and decoration of the head!
- Jointed elbows and shoulders come from the Articulated Hand project (and yes, one hand is fully articulated).
- Treads. That was the tough part. We tried several different ideas using wheels and bicycle inner tubes during the weeks we use for Inventions. During the last week we came up with using pool noodles and dowels. The inventor was very satisfied with this solution!
Myself, I'm thrilled with this invention! I completely respect the amount of focus and dedication required to put this together. Not to mention the attention to detail!
Quiz Cards: What happens next?
I love Quiz Cards. They are such a simple project. It's a simple circuit with an LED that lights up when you pick the right answer.
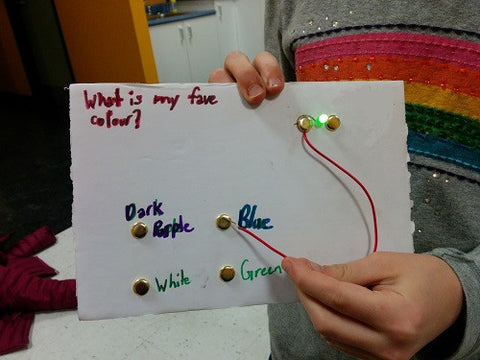
I first introduced them to a group of 9-12 year olds. They had a blast! They quickly figured out how to change the correct answer and had a great time making what they called "troll" questions. I was thrilled. By changing the circuit to change the answer, they were demonstrating a great working knowledge of circuits.
Then they wanted to add a red light. This consistently comes up in every group I work with. Now that they have the green light working, how can they add a red light for a wrong answer. No problem - I always have red LEDs on hand so the kids who finish first can give this a try. It's a bit tricky. And I don't hand out extra batteries to make it work. That's always the first request that comes up. (BTW I've tried conductive tape with this - I like conductive thread better. It's easier for the kids to change their answers.)

When I started introducing this project to the younger kids, ages 6-8, again I was surprised. Yes, it was harder to knot the conductive thread on the battery. (HINT: Practice tying knots first. I usually bring a ball of yarn and we practice tying knots before we start working.) But I almost never had to help with the circuit itself. They figured how to get it working themselves. For this age group, the circuit is a lot easier than writing the question.

We started off the latest session of the GNAG Inventors Workshop for 9-12 yr olds making Quiz Cards. But a couple of weeks later, I put in two weeks for Game Design. I gave them a few weeks notice that it was coming and a few of them started working on designs. For the games, they could use batteries, red or green LEDs, and buzzers. A few of them started working on Operation-style games. And I also had a few really cool light up games.
This first one is called Help Me. The original idea was to have a person behind the board lighting up the different LEDs. Depending on which LED was lit, the player needed to come up with a cure for an ailment.


But we wanted to automate it. We didn't want to have someone hiding behind the board. So we came up with this. We made a circle of connections to the LEDs with paper fasteners. Then we cut out a circle of cardboard and made one slice of it conductive. (Yay, tin foil!) Then we connected the battery to the conductive "slice". Now when you spin the wheel, different LEDs light up.

This next game blew me away. This was one of the kids who started planning early. There are 12 green LEDs and 4 wire leads. One 3V battery. Not to mention imagination, dedication and focus. It all works exactly as expected.

Yes - the tinfoil is part of the circuit too! Pretty impressive.
All of this was inspired by one simple project. Want to get started? You can pick up a Quiz Card kit in our online store. They're also part of the Makers Workshop. Contact me directly if you need enough for a class - I have bulk pricing for educators.
Our 3D Printing Adventure
Last summer we were very lucky to borrow a 3D printer from Young Maker to demo on our library workshop visits. Nanik enjoyed working with this technology and quickly became our resident expert. It was interesting to watch his progression as he explored this technology. We were using a Makerbot Replicator 2. I showed him how to print from the SD card and how to level the print bed. And then he was off!

More things to do with the MaKey MaKey
- Make controllers for their favourite games. For example, Minecraft. I usually provide cardboard, recyclables and tinfoil for an activity like this. I encourage big body movements - like footsteps. Here is a sample lesson plan on doing this: http://educade.org/
lesson_plans/use-makey-makey- to-design-a-videogame- controller. Create a game in Scratch and design the controllers for it. I had some grade 6's last year who designed a two player game and made controllers. Here's a photo. In the photo, the player on the left is holding a controller, the white wire is earth. 
- Create a physical game and add sounds to it. For example, an Operation Style game. We've used Scratch to assign sounds to keystrokes. Scratch has a big sound library or you can record your own sounds. This is an example of operation style game we made that looks like a monster: http://scratch.mit.edu/
projects/24954105/#editor. We've also used soundplant to map sounds to keystrokes. You can use Audacity to capture sounds as well. - I love making musical instruments. This Guitar has inspired many middleschool students. I was fascinated by the Ma Ma Clarinet. We had a middleschool student who made a flute this year. I have student right now working on a drum set. The music teacher at the school mentioned the possibility of making instruments for people with accessibility problems. That is an area I would like to explore.
- Another area I am interested in investigating is assistive technology. The MaKey MaKey gives us the ability to make a new interface to the computer. So what kind of interface would you use if you don't have full use of your fingers? Or can't use a mouse?
