- Continue Shopping
- Your Cart is Empty
uOttawa Mobile Makerspace
We love visiting the uOttawa Makerspace. Have you been yet? It's open to the community on Sundays and it's free to register and use their equipment. The people who work there are great! They are welcoming and happy to help you get started using one of their 3D printers. This is a fantastic resource to have in our community.
We were excited to learn that the Makerspace is going Mobile!

They had a prototype of the Maker Mobile at the university Alumni Week. Nanik and I went downtown to check it out May 9. All of the equipment from the makerspace was loaded inside the truck and outside on tables.
They were even showing off their new laser cutter! (Totally hard to see, but it says "Science Rocks!")

So why a mobile makerspace? The goal of the uOttawa Mobile Makerspace is outreach. In their first year of operations they aim to reach 1,000 kids in the Ottawa region from September 2015 - June 2016. The year after they want to take it across Eastern Ontario. Outreach to K-12 is a key factor in increasing enrollment in science and engineering. The more kids exposed to making (and science and engineering) the better! We're happy to support this initiative.

And the best news? I met Hanan Anis, Associate Professor and Faculty Coordinator in Entrepreneurship and Innovation, at an event yesterday and she showed me a photo of the new truck! It's happening. I can't wait!

Meet Ottawa Maker, Alan Rushforth
Earlier this year I was introduced to an Ottawa maker, Alan Rushforth. Alan is a retired Aeronautical Engineer and a prolific maker! If you've ever ridden the snowmobile simulator at the Canadian Museum of Science and Technology, you are familiar with his work.
Our 3D Printing Adventure
Last summer we were very lucky to borrow a 3D printer from Young Maker to demo on our library workshop visits. Nanik enjoyed working with this technology and quickly became our resident expert. It was interesting to watch his progression as he explored this technology. We were using a Makerbot Replicator 2. I showed him how to print from the SD card and how to level the print bed. And then he was off!

New! Two March Break Day Camps
I am very excited about our two days of March Break day camp at Maker Space North next month.
On Monday, March 16 we have Making Mods. A mod, or modification, turns something ordinary into something extraordinary. Join us to work with artist Petr Maur to mod your own ray gun. We’ll learn the basics from Petr and also get a chance to work on our own creations from parts and pieces and found objects. Registration for Making Mods on Eventbrite.

On Tuesday, March 17, we have Animatronics. Animatronics bring lifelike characteristics and movement to an otherwise inanimate object. Join us to work with local maker, Alan Rushforth, to learn the basics. Then we'll start work on our own creations. Have you ever wanted a pet dinosaur? Registration for Animatronics on Eventbrite.
Discounts for siblings and multiple day registrations. Use "Contact the Organizer" on Eventbrite for the coupon code.
More things to do with the MaKey MaKey
- Make controllers for their favourite games. For example, Minecraft. I usually provide cardboard, recyclables and tinfoil for an activity like this. I encourage big body movements - like footsteps. Here is a sample lesson plan on doing this: http://educade.org/
lesson_plans/use-makey-makey- to-design-a-videogame- controller. Create a game in Scratch and design the controllers for it. I had some grade 6's last year who designed a two player game and made controllers. Here's a photo. In the photo, the player on the left is holding a controller, the white wire is earth. 
- Create a physical game and add sounds to it. For example, an Operation Style game. We've used Scratch to assign sounds to keystrokes. Scratch has a big sound library or you can record your own sounds. This is an example of operation style game we made that looks like a monster: http://scratch.mit.edu/
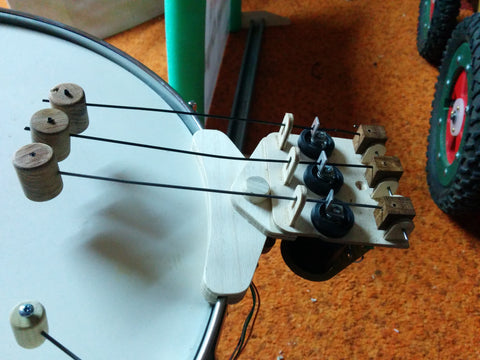
projects/24954105/#editor. We've also used soundplant to map sounds to keystrokes. You can use Audacity to capture sounds as well. - I love making musical instruments. This Guitar has inspired many middleschool students. I was fascinated by the Ma Ma Clarinet. We had a middleschool student who made a flute this year. I have student right now working on a drum set. The music teacher at the school mentioned the possibility of making instruments for people with accessibility problems. That is an area I would like to explore.
- Another area I am interested in investigating is assistive technology. The MaKey MaKey gives us the ability to make a new interface to the computer. So what kind of interface would you use if you don't have full use of your fingers? Or can't use a mouse?

What I would put in a middleschool makerspace
I've been lucky enough to visit some cool makerspaces lately. A couple of weeks ago, Nanik and I toured the new makerspace at the University of Ottawa. (We can't wait to go back!) We love to visit the ImagineSpace the Nepean Centrepointe branch of the Ottawa Public Library. And I was thrilled to be invited to participate in the opening of the Elmwood School Fab Lab.
One of the questions I often get asked is what would I put in a makerspace? Most of the making I do is with kids, and the age I most often work with is middleschool, grades 5-8. So if I was building a middleschool makerspace, this is how I would get started:
View full article →Toronto Mini Maker Faire 2014: Hitchbot Jr meets Hitchbot
 One of the things we were really excited about doing at the Toronto Mini Maker Faire was meeting Hitchbot. If you haven't met HitchbotJr yet, he's a project of EPCOTclass at Churchill Alternative public school. They were inspired by Hitchbot's travels across Canada. He's got a GPS running watch in his backpack.
View full article →
One of the things we were really excited about doing at the Toronto Mini Maker Faire was meeting Hitchbot. If you haven't met HitchbotJr yet, he's a project of EPCOTclass at Churchill Alternative public school. They were inspired by Hitchbot's travels across Canada. He's got a GPS running watch in his backpack.
View full article →
A "Bare Bones" Hallowe'en Maker Project for Kids
If you have been reading my blog for a while, you know that I try very hard to work with open-ended projects that the kids find meaningful. This week, the week before Hallowe'en, I had three workshops planned. I wanted an open-ended project to fit the time of year that we would all enjoy.
I started by asking the kids. In my junior Inventors Workshop last week, I asked them what they thought would make a good Hallowe'en project. We chatted about it as they finished working on their Talking Stuffies. They all thought something round would be good. Two glowing eyes were important. And orange. Lots of talk about orange. So, pumpkins. I thought this would be a week of pumpkins.
As I worked to gather my supplies, I looked for something round. Tennis balls were too heavy. Ping pong balls too small. I finally found some styrofoam balls at the dollar store. Perfect. I found some white, orange and black tissue paper. And I scored some sheer white fabric ends at a local curtain store.
Working with the styrofoam ball was fun. I enjoyed putting the prototype together. It was easy to poke the LED legs through the hole in the battery tab. A glue dot held the battery onto the ball easily. Paper fasteners kept everything together and on the ball. Conductive thread worked well to close the circuit and was easy to manipulate as a switch.

The kids loved it when I introduced my prototype as the bones of the project! The hardest part was explaining the parallel circuit. My primary group, who managed the quiz cards so well, was completely overwhelmed by this. The week before Hallowe'en is not the best week to introduce new concepts! Focus was definitely elsewhere.
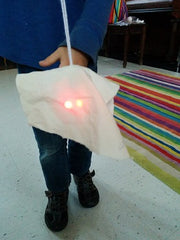
With the primary group we concentrated on ghosts. They had a lot of fun with the fabric and the yarn, but it was challenging for them to cut the fabric with their scissors. Having the tissue paper on hand helped with this. Once they got their LEDs to light up, they definitely got the hang of opening and closing the circuit. So that was successful. And playing with the ghosts afterwards was lots of fun!

The older kids I worked with this week really got into this activity. They did a great job of putting the circuits together. I liked the way the circuit worked on the ball for this. More than once, someone would get one LED lit up, but not both. The foam was easy to manipulate and change. That was an unexpected benefit. They were happy to problem solve and find the solution on their own.


As we started to gradually move away from ghosts I saw some great creations. Lots of bats and cats. I loved the spider with the dangling legs. But only one pumpkin! They all had to figure out how to decorate their "bones" and still keep a functional switch. I liked how a paper faster was often worked into the design as a mouth or a nose.


And my prototype? My "bones" finally got wrapped up into a mummy!

Toronto Mini Maker Faire, November 22-23

We are excited to announce that will be exhibiting at the Toronto Mini Maker Faire, November 22-23, at the Toronto Reference Library at Yonge & Bloor. Tickets are free! Come see what all the excitement is about.
View full article →How to safely take things apart
 If you've been following along for a while, you know that at Maker Junior we love to take things apart. Taking something apart is a fantastic way to learn how it works. Seeing a part in context provides great clues to understanding its function. If you're going to drop something off with electronics recycling, why not take the time to take it apart first? When we take things apart, we are always focused on safety. It is Safety First when we select what we're going to take apart, when we prepare the pieces to take apart, and when we get down to work.
View full article →
If you've been following along for a while, you know that at Maker Junior we love to take things apart. Taking something apart is a fantastic way to learn how it works. Seeing a part in context provides great clues to understanding its function. If you're going to drop something off with electronics recycling, why not take the time to take it apart first? When we take things apart, we are always focused on safety. It is Safety First when we select what we're going to take apart, when we prepare the pieces to take apart, and when we get down to work.
View full article →