- Continue Shopping
- Your Cart is Empty
Bringing Making Out of the Makerspace: Part I
* This is an excerpt from a presentation I made at Maker Faire, in San Mateo, on May 18 called "Bringing Making Out of the Makerspace". I'll be posting excerpts from that presentation this summer. *
Here's the scenario. I've got 30 kids, and 50 minutes. I need to engage their attention, teach them something new, and build confidence. I want to help as many of these kids as I can find their "inner maker" and I want leave them wanting more.
How?
We use open ended ended projects that light up, move or seem a little bit "dangerous". I like the projects we're working with because they inspire a mix of "I can do that!" and "I get to do that?". We use conductive paint and conductive thread to make electro cards, quiz cards and soft circuits and more. We use dc motors and vibration motors to make doodling robots and buzz bots. And, my favorite, we wear safety glasses and use tools to take things apart.
Open Ended Projects

- What I provide - very boring.
The goal at the end of the class is to come out with a successful project. But a project they they own. For the kids to be successful, the project has to fit within certain constraints – what they know and what they're learning, and what they can do in the amount of time that they're given. For any given project I provide a basic structure of materials, components, tools and techniques. But the kids put it together and fill it in. In this example here we're working with a basic circuit, conductive thread, LEDs and duct tape. I provide the parts, the "how to build a circuit", and the "velcro" switch – they kids do what they want with it. What they know is working with duct tape, what they're learning are basic circuits and switches, and given that and about an hour – they can usually come up with something pretty cool.

- The much cooler end results.

Age Appropriate
What is an age appropriate project? I think anyone who's worked with kids and maker projects will tell you, it's not about the age, it's about the kid. Different kids have different abilities. I hate to turn down anyone based on age. I will ask a parent to stick around and help. When I'm going into a classroom – there are a couple of different variables I consider. Always, vocabulary. This is a battery. This is an LED. This is an open circuit. This is a closed circuit. Give them the words they need to communicate. When giving instructions – consider their age and how new they are to this kind of activity. On one end of the spectrum you've got step by step instructions with everyone working together. On the other end, you're giving them a set of requirements that have to be met. Theory is important. Don't think they are too young! I had a grade 1 student explain circuits to me based on a Magic School Bus episode he had seen. And what you're working towards with the older kids is a quick review of theory with limited instructions. The last variable I consider is prep work. I try not to prep too much. Depending on how much time we have, I will strip wires, I definitely will thread and knot needles. I try not to assemble circuits. I'd rather walk them through testing their circuit instead. Is your LED in correctly? Let's test it.

- I like pizza too!

Do I even need a sample?
No. Definitely not. The younger kids need a sample. But depending on the age of the kids (say grades 4-5-6), and how they are working together, I try not to provide one. This can meet with absolutely excellent results. It can also be met with out and out frustration. Emphasize collaboration. Monitor closely for frustration. Some kids will thrive, some kids won't. But you want everyone to have some level of success.
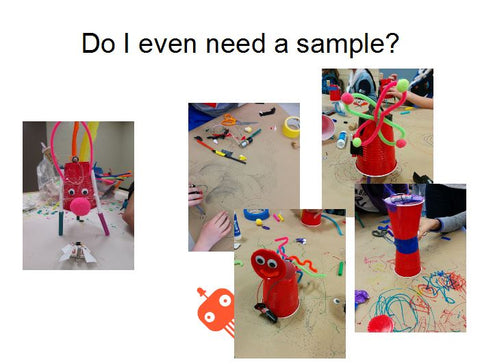
- Pictures of doodling robots created with a sample and without.

These pictures are examples of the doodling robot project, with a sample, and without. This was a mixed Grade 5/6 class, and my first time working with them. I love this one here – he actually cut 90% of the cup away to get the marker to spin from the motor. It's drawing, he's not touching it – it met the constraints.
* The next post in the series is here, Part II. *
Summer Workshops
School's out and summer is here! We have a full summer planned of workshops and events. Here's what our schedule looks like so far:
July 15 - Doodling Robots at the Ottawa Public Library, Beaverbrook Center
July 15 - Doodling Robots at the Ottawa Public Library, Emerald Plaza Branch
July 16 - Break & Make at the Ottawa Public Library, Elmvale Acres Branch
July 16 - Break & Make at the Ottawa Public Library, Main Branch
July 17 - Electro-cards at the Ottawa Public Library, Carlingwood Branch
July 17 - Soft Circuits at the Ottawa Public Library, Hazeldean Branch
July 23 - Doodling Robots at the Ottawa Public Library, North Gower Branch
July 24 - Doodling Robots and Break & Make at the North Grenville Public Library
July 28 - Aug 1 - Summer Camp at the Studio Cafe
August 5 - Doodlebots & Electro-cards at the Meaford Public Library
August 7 - Electro-cards at the Bruce County Public Library, Tara Branch
August 7 - Duct Tape at the Bruce County Public Library, Port Elgin Branch
August 7 - Electro-cards at the Bruce County Public Library, Chesley Branch
August 8 - Duct Tape at the Bruce County Public Library, Lucknow Branch
August 8 - Electro-cards at the Bruce County Public Library, Teeswater Branch
August 8 - Electro-cards at the Bruce County Public Library, Walkerton Branch
August 9 - Electro-cards & Doodlebots at the Owen Sound & North Grey Union Public Library
August 12 - Quiz Cards at the Ottawa Public Library, Orleans Branch
August 13 - Electro-cards at the Ottawa Public Library, Rosemount Branch
August 13 - Soft Circuits at the Ottawa Public Library, Sunnyside Branch
August 14 - Quiz Cards at the Ottawa Public Library, Manotick Branch
August 18 - Electro-cards at the Petawawa Public Library
August 19 - Doodlebots at the Perth & District Union Public Library
Montreal Mini Maker Faire
 There's quite a difference between one of the big Maker Faire's and a smaller Mini Maker Faire. We were just at
Maker Faire
last month. It was big and grand and impossible to see everything. In contrast, the Montreal Mini Maker Faire was warm and welcoming and everything a "Mini" maker faire could be. We were welcomed warmly, the makers were friendly and the atmosphere relaxed. It was wonderful to discover the making community in a city so close to home. Although I still didn't get a chance to see everything!
There's quite a difference between one of the big Maker Faire's and a smaller Mini Maker Faire. We were just at
Maker Faire
last month. It was big and grand and impossible to see everything. In contrast, the Montreal Mini Maker Faire was warm and welcoming and everything a "Mini" maker faire could be. We were welcomed warmly, the makers were friendly and the atmosphere relaxed. It was wonderful to discover the making community in a city so close to home. Although I still didn't get a chance to see everything!
Inspiration at the faire
Last year at the Ottawa Mini Maker Faire , my kids were quite taken by the masks shown by Ian Langohr . Ian's a talented artist working in Montreal. He is very generous with his work and my youngest was thrilled to try the masks on.

My oldest was very taken by the Anglerman mask. This is Ian's booth from the Montreal Mini Maker Faire last weekend. The Anglerman mask is in the lower left:
This weekend I was admiring Ian's work when I realized something. The Anglerman mask was the inspiration for Nanik's Hallowe'en costume this year. Nanik's been making his own costume for years. Sometimes it can be quite a convoluted process. But this year, there was no indecision, he was determined to be an angler fish. It took me while to dig up the photo once I realized that this weekend. I was so happy to show it to Ian. I think he was pleased too:
LoadingThis made my day last Saturday at the maker faire. Maker Junior is an organization based out of Ottawa that promotes kids learning about technology. I showed alongside them in Ottawa at the mini maker faire in 2013. One of the children involved in the project liked my anglerfish mask so much that he made his own anglerfish costume for Halloween last year, complete with LEDs in the lure. His mother was happy to show me the photo at the top this past weekend at the Faire and I asked if I could post it.
As a maker you come to the faire to share your work. I think it's great to see how your work inspires others. What have you seen at a maker faire that has inspired you? And have you let that maker know how inspired you were?
Maker Faire, San Mateo, May 2014
 Maker Faire is big. Really big. This is where it all started. The projects were definitely at a larger scale than anything I've seen before. And yes, there was more fire. We set up our booth and made electro-cards with about 140 kids who stopped by. It wasn't the fastest project we could have done, but it gave us a chance to talk and share. Most of the kids we talked to had trouble picking out a Faire favourite, we did too!
View full article →
Maker Faire is big. Really big. This is where it all started. The projects were definitely at a larger scale than anything I've seen before. And yes, there was more fire. We set up our booth and made electro-cards with about 140 kids who stopped by. It wasn't the fastest project we could have done, but it gave us a chance to talk and share. Most of the kids we talked to had trouble picking out a Faire favourite, we did too!
View full article →
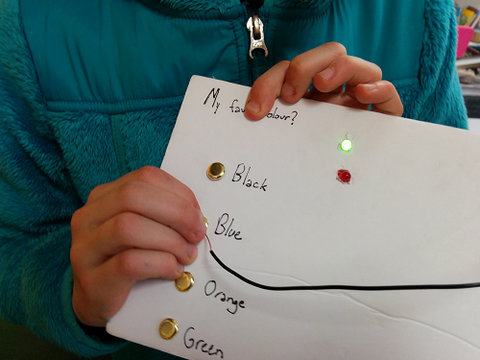
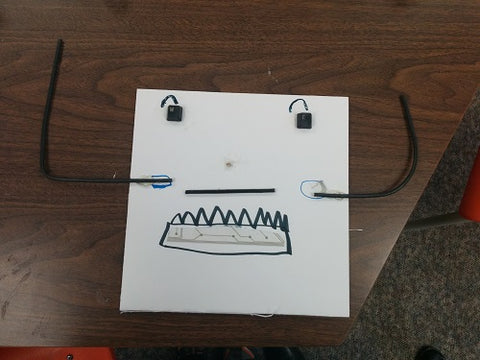
Quiz Cards with red and green LED's
Every time I do a quiz card workshop, somebody always asks for red LED's. Usually, we use green LED's. That way, when you are playing the game and pick the right answer, the green light goes on. I like this version. It's easy and fun to change the "right" answer to trick the people you're playing with. But when I run the workshop, there are always a few kids who ask for red LED's, too. They want the green light to go on when the answer is correct, but they also want a red LED to go on when the answer is wrong. Usually I bring a couple of red LED's and leave them as a challenge. The last time I visited the Rainbow Eggheads , I did promise to send them a picture of a quiz card circuit with a red and a green LED. They're a savvy group - I'll post it here instead.
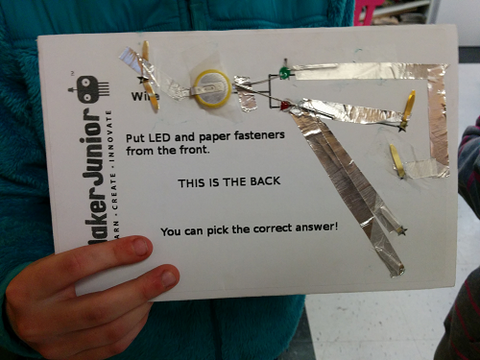
We had worked with the green-light quiz card in the winter session of the Inventors' Workshop and quite a few of them had asked me about adding red LED's. One of the biggest challenges with the quiz cards is knotting the conductive thread through the hole in the tabbed battery. Wrapping the thread around the paper fasteners is easy, but connecting it to the battery is hard. I thought it was time to try out some of the conductive foil tapes. So I used a roll of aluminum conductive foil tape and some red LED's from Newark Electronics/ element 14 .
The tape was fun to work with. But everything has it's own challenges! We had to make sure there was always a good connection between the tape and the component, so we wrapped the tape around the paper fasteners and battery terminals. It was easy to stick down the LED legs with the tape. One of our inventors came up with a new way to fasten the LED to the card and we all liked it so much we started using it.

So now we know how to make Quiz Cards with both red and green LED's. I do like the green LED circuit, it's easier to put together when you're learning. I think what I'll do is modify my Quiz Card circuit so that it is easier to see how to add the red LED's in. I'll continue to start the workshops with the green LED's, and once that's working, I'll leave the red LED's as a challenge. It's always easier to get things working one step at a time!
Spring 2014 Workshops
Our Spring Workshops are set up and ready to go! Workshops will be held at the Glen Cairn Community Centre in Kanata and new this session we will have workshops in Hintonburg at The Studio Cafe.
Kanata
Maker Junior Spring Series 2014 - Kanata
Sign up for the series to attend all three Maker Junior workshops scheduled for this Spring and save $15.00. Register online at Eventbrite.
April 22: Break and Make
Learn how something works by taking it apart. Use the parts to build your own 2D/3D creation. Register online at Eventbrite.
May 13: Talking Stuffie
Use a voice recorder circuit to make a talking stuffie that records the sound of your own voice. Register online at Eventbrite.

June 17: Learn to Solder (Parent & Child)
Parent and Child work together to make flashing badges that really light up! Tools will be provided. Register online at Eventbrite.
Hintonburg
Maker Junior Spring Series 2014 - Hintonburg
Sign up for the series to attend both Maker Junior workshops scheduled for this Spring and save $10.00. Register online at Eventbrite.
May 10: Motors and Movement
Work with DC motors to learn how vibration creates motion. Create doodling robots and origami buzz bots. Register online at Eventbrite.

May 24: Break and Make
Learn how something works by taking it apart. Use the parts to build your own 2D/3D creation. Register online at Eventbrite.
Bring on the Doodle Bots!

The kids and I had a very doodly March Break. We had several events planned and the doodle bots were the activity of choice. It's a good activity for mixed age groups and is always a lot of fun.
We held two workshops in Lombardy and Elgin for the Rideau Lakes Library. We were part of their Mighty Mini Makers! program. At each workshop we built some Electro-cards and made doodle bots as the paint was drying. The Electro-cards are always fun. Theme of the day was hockey nets. Libraries are our favourite places and we always love being asked to come work in one. Kids love being encouraged to doodle and get creative in the library. In the words of one participant, this workshop was "AWESOME!".
Our next event was the Lanark Community Programs March Break day camp. We had loads of fun building doodle bots with both staff and campers. The campers showed great focus and engagement when working on their doodle bots. The Camp Director said it was the highlight of their week.
Our Maker Junior workshop was engaging, educational and fun for kids and adults. It was the highlight of our march break day camp.
- Andrew Sauvé, Camp Director, Lanark Community Programs
Andrew had come up with some great games to play with the doodle bots once they were made. I really liked the Sumo inspired game. Very simple and fun to play!
Thanks to everyone who participated in our workshops. It is always a treat for us to meet with so many fun and creative people.

I did what I wanted to do - success!
A while back I was invited to a meeting of the 113th Ottawa Girl Guides. Their leader thought they would enjoy making some doodling robots. We covered a couple of tables in brown paper and spread out some basic supplies like duct tape and scissors. Without showing them a sample, I handed out cups, markers, motors, batteries, wire and corks and I issued them a challenge. I told them they had everything they needed to make a robot that doodled. At first, they didn't quite believe me. Before we sat down I had shown them how to hook up the wires to the motor and make a circuit with the battery. Now it was time to try it themselves.
Girl Guides are girls in grades 4 - 6. The 113th are the local troop, meaning most of these girls are in school with my sons. It was fun to spend some with them and watch them work. And they did such a great job! I saw lots of great thinking and new ideas.
One girl flipped up the bottom of her cup to make a face:

Another girl took the time to work out some plans on the paper before she began:

As the evening went on, lots of girls began experimenting with what was used to offset the motor. Some girls started using electrical tape. One girl started making something a little more elaborate:

Every robot was unique. And they all doodled. I loved seeing all the different designs they came up with. And I loved hearing this most of all. (Make sure you've got your sound on to hear this!)
Back with @churchill209
Remember the Rainbow Eggheads? I first visited with them back in December. I had a chance to visit with them again at the end of February. Their teacher, Shauna Pollock, asked if I could come up with something that combined the Grade 5 science topic, states of matter, with the Grade 6 science topic of electricity. What we decided on was a project that combined questions on the states of matter with the quiz card project that I've worked on before. I'm going to let their tweets tell this story:
Getting ready to make our QUIZ CARDS!!! #makerED pic.twitter.com/BcizYAsyRN
— Churchill Room 209 (@churchill209) February 27, 2014
#makerED @maker_junior Alison is now explaining how it lights up! pic.twitter.com/STo21FDKZx
— Churchill Room 209 (@churchill209) February 27, 2014
Everyone is tuned in! pic.twitter.com/s1elfmYFrQ
— Churchill Room 209 (@churchill209) February 27, 2014
Making quiz cards with maker junior.Getting the instructions right now #makered @maker_junior pic.twitter.com/eMtT5zhcif
— Churchill Room 209 (@churchill209) February 27, 2014
@maker_junior #makered learning how to make a light up quiz card pic.twitter.com/itZwP6KS5r
— Churchill Room 209 (@churchill209) February 27, 2014
@maker_junior #makered learning about a book safe and conductive paint and thread.Wanting to do more pic.twitter.com/BRcAAhUM2a
— Churchill Room 209 (@churchill209) February 27, 2014
And we're off pic.twitter.com/BmWuEdtal5
— Churchill Room 209 (@churchill209) February 27, 2014
Starting is the best part! pic.twitter.com/IcUigSb1nZ
— Churchill Room 209 (@churchill209) February 27, 2014
#makered @maker_junior almost done,putting on the conductive thread pic.twitter.com/HdViqyaWJG
— Churchill Room 209 (@churchill209) February 27, 2014
#makerED @maker_junior almost done pic.twitter.com/K4DlMmTnMR
— Churchill Room 209 (@churchill209) February 27, 2014
adding the finishing touches pic.twitter.com/om6Dkzu6gv
— Churchill Room 209 (@churchill209) February 27, 2014
and we're almost done pic.twitter.com/WdyBkyQDtg
— Churchill Room 209 (@churchill209) February 27, 2014
finished!Thank you@maker_junior we'll always want to do it again #makerED pic.twitter.com/4NQBWw7aWg
— Churchill Room 209 (@churchill209) February 27, 2014
#makerED pic.twitter.com/kpiORBG2eu
— Churchill Room 209 (@churchill209) February 27, 2014
#makerED pic.twitter.com/XIy0n3I18H
— Churchill Room 209 (@churchill209) February 27, 2014
Now, did they like it? Everyday this class blogs about "What Stuck With Us Today". There are lots of comments about this activity in their daily blog post:
Blogged: What Stuck With Us Today (Ss fill this out daily on Google forms) http://t.co/X2KqmrQEXY @churchill209 @maker_junior — Shauna Pollock (@misspollock) February 28, 2014
And hey, Shauna liked it too!
Alison from @maker_junior blows us away as always! Today we are making Quiz Cards AND she showed us her smart watch! pic.twitter.com/PAIollcBfa — Shauna Pollock (@misspollock) February 27, 2014
What stuck with me? This class is great. It can be frustrating working with new tools - but they asked questions and stuck with it until everybody got their quiz card working. There were kids helping other kids - I like that. And there was lots of curiosity and wanting to do more. Like, how do I hook up a red LED too? (I still owe them an answer on that one!) And just like last time, they are inspiring me with their social media skills. Thanks, @churchill209, it is always great to spend time with you!