- Continue Shopping
- Your Cart is Empty
What is an Inventors Workshop?
I've blogged about the Inventors Workshop that we offer through the Glebe Neighbourhood Activities Group before. But what I haven't shown you are the results! This fall we have two sessions of the Inventors Workshop. Mondays after school for the 6-8 year olds and Thursdays after school for the 9-12 year olds. We have a longer session so we have a chance to cover more aspects of the inventive process. The workshop starts next week and there's still spots available so register now!
Inventors Notebook
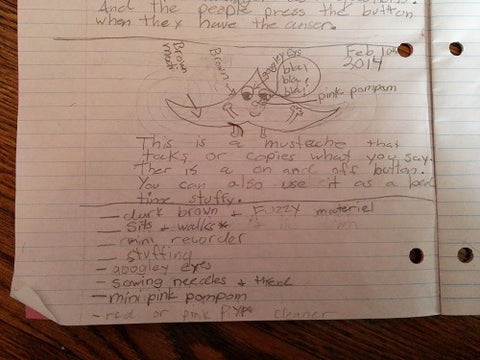
At the first class I introduce the idea of the inventors notebook. It's important for all inventors to keep track of their ideas. We date each entry as we work in our notebooks through the following weeks. It's important to keep track of what we're thinking of so we can show that an invention is ours. Did you know that Edison kept notebooks all over his lab? He knew how important it was to document his work. And how easy it is to forget to do it. I love the notebooks we keep in this class and how they reflect the ideas everyone is working on. Not every entry is focused on the same idea. I like to show different inventions to get everyone thinking of how to solve common problems. Here's a great idea from the winter on how to deal with driveway clearing:

- Snow Invention

Process of Invention
There's a lot that goes into an invention aside from the creation of the prototype itself. When we did the Young Inventor Challenge, our Workbook covered testing the prototype and turning the prototype into a product. This fall's workshop is longer than the winter workshop, and we'll be able to cover both the test and product phase during the class and work on making some promotional materials. Should be lots of fun!

- Sample poster board display

Of course, the best part of the workshop are the inventions themselves! Building the prototype is loads of fun, and it is great to see an invention come to life. Here are some examples of inventions that have come out of previous classes.
Invention #1 - Talking Mustache, a.k.a. Mr. Moustachio
In this class, two girls worked together to create talking mustaches. The voice circuits we found to create these inventions turned out to be such a great hit, that we've gone on to build many other talking stuffies with kids in this workshop and others.
- Plans, including a supply list

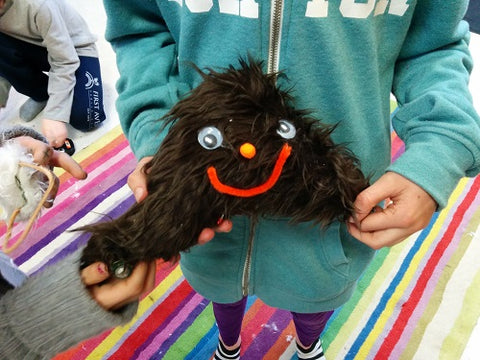
- Mr Moustachio - the final product.

Invention #2 - Landing Lights
Another young inventor wanted to add landing lights to his existing lego airplane. I've found that conductive thread and flat, tabbed 3V's work really well when adding LEDs to legos. We drew out a basic schematic in his plans for how he would do it.

- Plans for lighting up the lego airplane

And we were very pleased with the final result! He put the LEDs in lego pieces that had a single hole and they fit really well. We used flashing LEDs, so this picture only caught one LED lit up. We had some plans to try and get a motor working to spin the propeller too - but that's phase two.
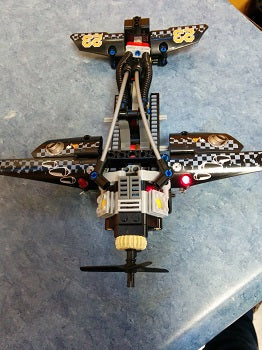
- Flashing LED landing lights

Invention #3 - RC Mouse
One of our inventors is a talented sewer. She wanted to make a remote controlled mouse toy. She had a very comprehensive list of parts.

- Supply list for an RC Mouse

She used an existing RC car base and built a mouse on top of it. She had to build the mouse so that the RC sensors weren't covered, and there was a way to access the battery compartment. One challenge that we didn't anticipate was the fur getting caught in the wheels. But a careful trim solved that problem!
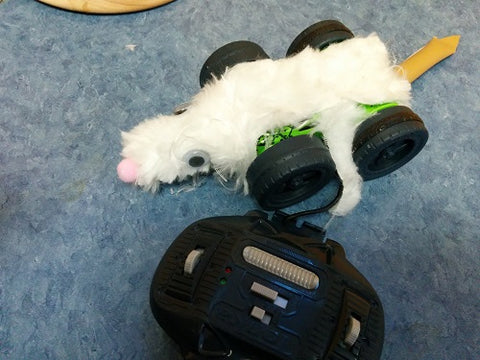
- Remote Control Mouse
