- Continue Shopping
- Your Cart is Empty
Eureka! See what we've made this summer
 We've had a busy summer so far giving workshops in libraries as part of the
Eureka! TD Summer Reading Club
. We're not done yet! We have more to go - but we thought it would be great to share what we've made so far. Check our
schedule
to find a workshop near you.
We've had a busy summer so far giving workshops in libraries as part of the
Eureka! TD Summer Reading Club
. We're not done yet! We have more to go - but we thought it would be great to share what we've made so far. Check our
schedule
to find a workshop near you.
Bringing Making Out of the Makerspace: Part II
* This is an excerpt from a presentation I made at Maker Faire, in San Mateo, on May 18 called "Bringing Making Out of the Makerspace". I'll be posting excerpts from that presentation this summer. I started with this post, Part I *
Technique
As you can see from the projects I've shown so far, I have a heavy mix of traditional arts and crafts materials with some technical components worked in. That's intentional. I like to mix the familiar with something new. The idea is for kids to say "I can do that". "I can paint". The familiar, the kids can handle on their own, and it gives them confidence. It's important to reaffirm the familiar – it's paint, you've painted before, right? The familiar brings confidence. The new – I demonstrate. I demonstrate to the kids, to the teachers, and any volunteers in the classroom. Then we practice. We light up LEDs. Then we test as we go.

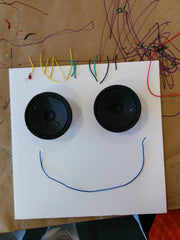
These cards are a great example. This was project with a Primary Maker Club at a local elementary school. They're the Dunlop Dragons – so I put a dragon on the card. This looks like a colouring project, they've done that a million times before. The schematic – definitely new. The construction paper switch? No problem. Painting? Easy. The hardest part of this project is getting the positive and negative legs of LED lined up correctly with the battery. So first, we play with the battery and the LED. I show them how to light up the LED. I ask them to light up their LED just on the battery. Then we put in the card. Next – we test it. Using wires, and a buddy, we make a circuit to see if the LED lights up. Then we paint the circuit carefully. Painting is no problem. How to paint carefully – that is something they are already learning. And we can talk them through what is required to paint carefully to make a circuit.
Prep
Okay, so lets get ready. Sometimes, when I visit a class, I have 50 minutes. Sometimes, if I'm coming in for a recess program, I'll have 40. And sometimes – I'll have 25min. As far as supplies go, it's better to have more rather than less. I don't assume they have anything. But I have also found that it is crucial not to spend time handing out parts. I will pre-package everything they need into supply boxes and carry extras with me to use as required. This limits the time we spend getting everything handed out and maximizes the time they spend making.

For supply boxes I use these 8 1/2" x 11" copy boxes from my local office supply store. I stick a page protector on the front for any instructions or visual aids they might need, and I load up the boxes with the tools and components required for them to start working.
I also spend time prepping for a successful start. It's important that the kids start their projects successfully. A successful start means everyone can get started right away – and then we deal with the problems when they come up. The Prep work I do for one of our Break and Make workshops is a good example of this. These are the workshops where we take things apart. I go through each piece, make sure the first layer of screws are loose, and package it with the right screwdriver. I keep a bigger box of tools that the kids can come look through as they need to, but at least they can get started right away. That's one of my goals of prepwork.
* The next post in the series is here, Part III. *
Bringing Making Out of the Makerspace: Part I
* This is an excerpt from a presentation I made at Maker Faire, in San Mateo, on May 18 called "Bringing Making Out of the Makerspace". I'll be posting excerpts from that presentation this summer. *
Here's the scenario. I've got 30 kids, and 50 minutes. I need to engage their attention, teach them something new, and build confidence. I want to help as many of these kids as I can find their "inner maker" and I want leave them wanting more.
How?
We use open ended ended projects that light up, move or seem a little bit "dangerous". I like the projects we're working with because they inspire a mix of "I can do that!" and "I get to do that?". We use conductive paint and conductive thread to make electro cards, quiz cards and soft circuits and more. We use dc motors and vibration motors to make doodling robots and buzz bots. And, my favorite, we wear safety glasses and use tools to take things apart.
Open Ended Projects

- What I provide - very boring.
The goal at the end of the class is to come out with a successful project. But a project they they own. For the kids to be successful, the project has to fit within certain constraints – what they know and what they're learning, and what they can do in the amount of time that they're given. For any given project I provide a basic structure of materials, components, tools and techniques. But the kids put it together and fill it in. In this example here we're working with a basic circuit, conductive thread, LEDs and duct tape. I provide the parts, the "how to build a circuit", and the "velcro" switch – they kids do what they want with it. What they know is working with duct tape, what they're learning are basic circuits and switches, and given that and about an hour – they can usually come up with something pretty cool.

- The much cooler end results.

Age Appropriate
What is an age appropriate project? I think anyone who's worked with kids and maker projects will tell you, it's not about the age, it's about the kid. Different kids have different abilities. I hate to turn down anyone based on age. I will ask a parent to stick around and help. When I'm going into a classroom – there are a couple of different variables I consider. Always, vocabulary. This is a battery. This is an LED. This is an open circuit. This is a closed circuit. Give them the words they need to communicate. When giving instructions – consider their age and how new they are to this kind of activity. On one end of the spectrum you've got step by step instructions with everyone working together. On the other end, you're giving them a set of requirements that have to be met. Theory is important. Don't think they are too young! I had a grade 1 student explain circuits to me based on a Magic School Bus episode he had seen. And what you're working towards with the older kids is a quick review of theory with limited instructions. The last variable I consider is prep work. I try not to prep too much. Depending on how much time we have, I will strip wires, I definitely will thread and knot needles. I try not to assemble circuits. I'd rather walk them through testing their circuit instead. Is your LED in correctly? Let's test it.

- I like pizza too!

Do I even need a sample?
No. Definitely not. The younger kids need a sample. But depending on the age of the kids (say grades 4-5-6), and how they are working together, I try not to provide one. This can meet with absolutely excellent results. It can also be met with out and out frustration. Emphasize collaboration. Monitor closely for frustration. Some kids will thrive, some kids won't. But you want everyone to have some level of success.
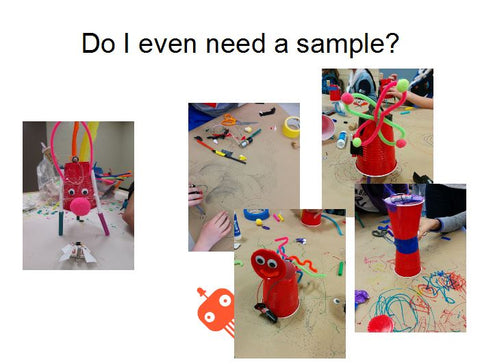
- Pictures of doodling robots created with a sample and without.

These pictures are examples of the doodling robot project, with a sample, and without. This was a mixed Grade 5/6 class, and my first time working with them. I love this one here – he actually cut 90% of the cup away to get the marker to spin from the motor. It's drawing, he's not touching it – it met the constraints.
* The next post in the series is here, Part II. *
Montreal Mini Maker Faire
 There's quite a difference between one of the big Maker Faire's and a smaller Mini Maker Faire. We were just at
Maker Faire
last month. It was big and grand and impossible to see everything. In contrast, the Montreal Mini Maker Faire was warm and welcoming and everything a "Mini" maker faire could be. We were welcomed warmly, the makers were friendly and the atmosphere relaxed. It was wonderful to discover the making community in a city so close to home. Although I still didn't get a chance to see everything!
There's quite a difference between one of the big Maker Faire's and a smaller Mini Maker Faire. We were just at
Maker Faire
last month. It was big and grand and impossible to see everything. In contrast, the Montreal Mini Maker Faire was warm and welcoming and everything a "Mini" maker faire could be. We were welcomed warmly, the makers were friendly and the atmosphere relaxed. It was wonderful to discover the making community in a city so close to home. Although I still didn't get a chance to see everything!
Inspiration at the faire
Last year at the Ottawa Mini Maker Faire , my kids were quite taken by the masks shown by Ian Langohr . Ian's a talented artist working in Montreal. He is very generous with his work and my youngest was thrilled to try the masks on.

My oldest was very taken by the Anglerman mask. This is Ian's booth from the Montreal Mini Maker Faire last weekend. The Anglerman mask is in the lower left:
This weekend I was admiring Ian's work when I realized something. The Anglerman mask was the inspiration for Nanik's Hallowe'en costume this year. Nanik's been making his own costume for years. Sometimes it can be quite a convoluted process. But this year, there was no indecision, he was determined to be an angler fish. It took me while to dig up the photo once I realized that this weekend. I was so happy to show it to Ian. I think he was pleased too:
LoadingThis made my day last Saturday at the maker faire. Maker Junior is an organization based out of Ottawa that promotes kids learning about technology. I showed alongside them in Ottawa at the mini maker faire in 2013. One of the children involved in the project liked my anglerfish mask so much that he made his own anglerfish costume for Halloween last year, complete with LEDs in the lure. His mother was happy to show me the photo at the top this past weekend at the Faire and I asked if I could post it.
As a maker you come to the faire to share your work. I think it's great to see how your work inspires others. What have you seen at a maker faire that has inspired you? And have you let that maker know how inspired you were?
Maker Faire, San Mateo, May 2014
 Maker Faire is big. Really big. This is where it all started. The projects were definitely at a larger scale than anything I've seen before. And yes, there was more fire. We set up our booth and made electro-cards with about 140 kids who stopped by. It wasn't the fastest project we could have done, but it gave us a chance to talk and share. Most of the kids we talked to had trouble picking out a Faire favourite, we did too!
View full article →
Maker Faire is big. Really big. This is where it all started. The projects were definitely at a larger scale than anything I've seen before. And yes, there was more fire. We set up our booth and made electro-cards with about 140 kids who stopped by. It wasn't the fastest project we could have done, but it gave us a chance to talk and share. Most of the kids we talked to had trouble picking out a Faire favourite, we did too!
View full article →
Bring on the Doodle Bots!

The kids and I had a very doodly March Break. We had several events planned and the doodle bots were the activity of choice. It's a good activity for mixed age groups and is always a lot of fun.
We held two workshops in Lombardy and Elgin for the Rideau Lakes Library. We were part of their Mighty Mini Makers! program. At each workshop we built some Electro-cards and made doodle bots as the paint was drying. The Electro-cards are always fun. Theme of the day was hockey nets. Libraries are our favourite places and we always love being asked to come work in one. Kids love being encouraged to doodle and get creative in the library. In the words of one participant, this workshop was "AWESOME!".
Our next event was the Lanark Community Programs March Break day camp. We had loads of fun building doodle bots with both staff and campers. The campers showed great focus and engagement when working on their doodle bots. The Camp Director said it was the highlight of their week.
Our Maker Junior workshop was engaging, educational and fun for kids and adults. It was the highlight of our march break day camp.
- Andrew Sauvé, Camp Director, Lanark Community Programs
Andrew had come up with some great games to play with the doodle bots once they were made. I really liked the Sumo inspired game. Very simple and fun to play!
Thanks to everyone who participated in our workshops. It is always a treat for us to meet with so many fun and creative people.

Buffalo Mini Maker Faire
Last weekend the boys and I were happy to participate in the inaugural Buffalo Mini Maker Faire. We met the organizer in NYC at the 2013 World Maker Faire and he had mentioned it then. Buffalo is not too far from Ottawa and we've got family there, so it was a great opportunity to connect with a new community of makers.
And there were lots of makers there! The Buffalo Museum of Science has four floors of exhibit space and there were makers on every floor. We were in the Sparks! Workshop on the third floor with the Elmwood Franklin School Maker Club and the super cool Aidan 3 and his 3D printer demo. Just down the hall the Buffalo Lab was holding a soldering workshop with these great "I Can Solder" badges. Destination Imagination had all sorts of stuff going on - it was the first time I'd heard about this great program and was happy to hear it was global!

The boys and I were demonstrating the doodling robots and making electro-cards with the kids that came by. I didn't get too much time away from the booth. But I did manage to pick up a Buffalo sweatshirt from Mad Jack Productions (t-shirts and 3D printing - how cool is that?), see where all the packets of salt scrub were being made at Azariah's Innocence , marvel at the cardboard pirate ship and almost shook hands with Chewbacca . I was happy to see everyone busy and wearing their safety glasses at Take It Apart . And I was very excited to see the exhibits at the Young Makers section in the lobby on the first floor. Keep making!

There certainly appears to be a thriving community of makers in Buffalo. Judging from the jam-packed parking lots and hallways there is a lot interest, too! I was sorry to have to miss the after-party being held at The Foundry. It looks like a great place. A lot of the makers at the faire work out of there. Community is so important to making.
Also thanks to the Western New York Book Arts Center. They gave each maker a print as a thank you for participating. They also gave prints at the World Maker Faire. These pieces are really beautiful. Thank you! Wish I was in town for the Edible Book Festival on March 30th, 2014 - it looks like a unique event.
Hamboree Mini Maker Faire 2014
Earlier this month we were visiting with family down in South Florida. While we were there we took the opportunity to set up at the Hamboree Mini Maker Faire. This was the first year for the Hamboree Mini Maker Faire but the 47th year for the Hamboree! I was excited when I found out they were combining a maker faire with a ham radio convention. We're not Hams but are big fans of the community.
A "Ham" is an amateur radio operator. Amateur Radio has been around for a long time. To transmit as an operator, you need to pass a licensing exam and receive a call sign. Hams often build and maintain their own equipment. Many electrical engineers got their start as kids building radios and becoming licensed. Hams and makers have a lot in common. Ham radio conventions are great places to find stuff. Old electronics. Inventions. Tools. Radios. Test equipment. They are great places to browse and find some good deals. As a maker, I enjoy attending a ham radio convention so I was excited about having a combined Hamboree and Mini Maker Faire.
The Mini Maker Faire was on the Saturday. There were a small number of makers attending, it's just the first year. There was a VEX IQ Challenge robotics competition that brought in a lot of kids and their families from area schools. We set up a booth where we showed some sample projects, photos of artwork that kids in our workshops have done, and made electro-cards with many of the kids attending the event.
Terry and Mary Alice were there with Yourduino. They had a couple of neat projects set up to show what you can do. Mary Alice gave my son a starter kit that he's had a lot of fun with - more on that later!

We were mesmerized by Artisan Kelan's steampunk creations. The kids attending the robotics competition loved his work and touched everything. I was impressed with his patience.

We also had a chance to play with a MaKey MaKey with Vincent. Always fun. We particularly enjoyed the Munching Banana Keyboard.
Round that off with with telescopes from the Southern Cross Astronomical Society and more robots from StarBot , it was a great show. Thanks to the organizers for pulling it together, I am looking forward to seeing it grow!
Inventors' Workshop
I am very excited about the Inventors' Workshop I'm leading this winter with the Glebe Neighbourhood Activies Group (GNAG). The workshop will be held Winter 2014, Mondays from 4:00 – 5:15pm from Jan 6 to March 17. It's a nine-week workshop where we will be learning about some different technical tools, creating several different projects, and working on our own inventions!
The workshop starts off with exploring motors and movement, looking at different motors and how we can get our creations to "move".
In the following weeks we'll look at basic circuits and some alternative materials, like conductive paint and conductive thread, to make greeting cards and quiz games that light up using LEDs and batteries.

Then we'll take apart some consumer electronics to see what's going on inside.

We're going to explore PCB's a little more closely. We're even going to learn how to solder.
Throughout the workshop, we'll be writing down ideas in our Inventors' Notebooks. In the last couple of weeks, each student will be working on their own inventions based on the projects we have previously worked on.
If you have any questions, please don't hesitate to contact me! Registration opens December 12.