- Continue Shopping
- Your Cart is Empty
Inspiration at the faire
Last year at the Ottawa Mini Maker Faire , my kids were quite taken by the masks shown by Ian Langohr . Ian's a talented artist working in Montreal. He is very generous with his work and my youngest was thrilled to try the masks on.

My oldest was very taken by the Anglerman mask. This is Ian's booth from the Montreal Mini Maker Faire last weekend. The Anglerman mask is in the lower left:
This weekend I was admiring Ian's work when I realized something. The Anglerman mask was the inspiration for Nanik's Hallowe'en costume this year. Nanik's been making his own costume for years. Sometimes it can be quite a convoluted process. But this year, there was no indecision, he was determined to be an angler fish. It took me while to dig up the photo once I realized that this weekend. I was so happy to show it to Ian. I think he was pleased too:
LoadingThis made my day last Saturday at the maker faire. Maker Junior is an organization based out of Ottawa that promotes kids learning about technology. I showed alongside them in Ottawa at the mini maker faire in 2013. One of the children involved in the project liked my anglerfish mask so much that he made his own anglerfish costume for Halloween last year, complete with LEDs in the lure. His mother was happy to show me the photo at the top this past weekend at the Faire and I asked if I could post it.
As a maker you come to the faire to share your work. I think it's great to see how your work inspires others. What have you seen at a maker faire that has inspired you? And have you let that maker know how inspired you were?
Maker Faire, San Mateo, May 2014
 Maker Faire is big. Really big. This is where it all started. The projects were definitely at a larger scale than anything I've seen before. And yes, there was more fire. We set up our booth and made electro-cards with about 140 kids who stopped by. It wasn't the fastest project we could have done, but it gave us a chance to talk and share. Most of the kids we talked to had trouble picking out a Faire favourite, we did too!
View full article →
Maker Faire is big. Really big. This is where it all started. The projects were definitely at a larger scale than anything I've seen before. And yes, there was more fire. We set up our booth and made electro-cards with about 140 kids who stopped by. It wasn't the fastest project we could have done, but it gave us a chance to talk and share. Most of the kids we talked to had trouble picking out a Faire favourite, we did too!
View full article →
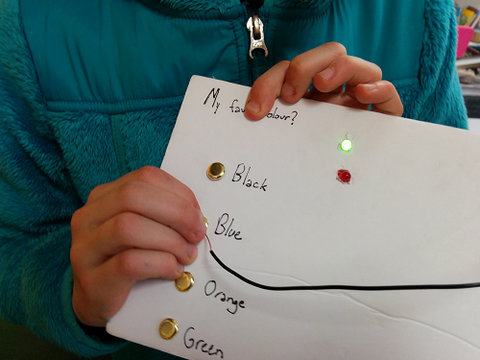
Quiz Cards with red and green LED's
Every time I do a quiz card workshop, somebody always asks for red LED's. Usually, we use green LED's. That way, when you are playing the game and pick the right answer, the green light goes on. I like this version. It's easy and fun to change the "right" answer to trick the people you're playing with. But when I run the workshop, there are always a few kids who ask for red LED's, too. They want the green light to go on when the answer is correct, but they also want a red LED to go on when the answer is wrong. Usually I bring a couple of red LED's and leave them as a challenge. The last time I visited the Rainbow Eggheads , I did promise to send them a picture of a quiz card circuit with a red and a green LED. They're a savvy group - I'll post it here instead.
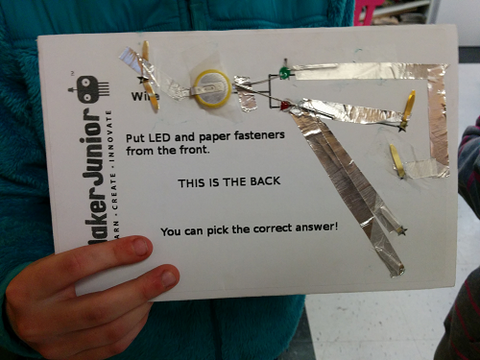
We had worked with the green-light quiz card in the winter session of the Inventors' Workshop and quite a few of them had asked me about adding red LED's. One of the biggest challenges with the quiz cards is knotting the conductive thread through the hole in the tabbed battery. Wrapping the thread around the paper fasteners is easy, but connecting it to the battery is hard. I thought it was time to try out some of the conductive foil tapes. So I used a roll of aluminum conductive foil tape and some red LED's from Newark Electronics/ element 14 .
The tape was fun to work with. But everything has it's own challenges! We had to make sure there was always a good connection between the tape and the component, so we wrapped the tape around the paper fasteners and battery terminals. It was easy to stick down the LED legs with the tape. One of our inventors came up with a new way to fasten the LED to the card and we all liked it so much we started using it.

So now we know how to make Quiz Cards with both red and green LED's. I do like the green LED circuit, it's easier to put together when you're learning. I think what I'll do is modify my Quiz Card circuit so that it is easier to see how to add the red LED's in. I'll continue to start the workshops with the green LED's, and once that's working, I'll leave the red LED's as a challenge. It's always easier to get things working one step at a time!
Bring on the Doodle Bots!

The kids and I had a very doodly March Break. We had several events planned and the doodle bots were the activity of choice. It's a good activity for mixed age groups and is always a lot of fun.
We held two workshops in Lombardy and Elgin for the Rideau Lakes Library. We were part of their Mighty Mini Makers! program. At each workshop we built some Electro-cards and made doodle bots as the paint was drying. The Electro-cards are always fun. Theme of the day was hockey nets. Libraries are our favourite places and we always love being asked to come work in one. Kids love being encouraged to doodle and get creative in the library. In the words of one participant, this workshop was "AWESOME!".
Our next event was the Lanark Community Programs March Break day camp. We had loads of fun building doodle bots with both staff and campers. The campers showed great focus and engagement when working on their doodle bots. The Camp Director said it was the highlight of their week.
Our Maker Junior workshop was engaging, educational and fun for kids and adults. It was the highlight of our march break day camp.
- Andrew Sauvé, Camp Director, Lanark Community Programs
Andrew had come up with some great games to play with the doodle bots once they were made. I really liked the Sumo inspired game. Very simple and fun to play!
Thanks to everyone who participated in our workshops. It is always a treat for us to meet with so many fun and creative people.

I did what I wanted to do - success!
A while back I was invited to a meeting of the 113th Ottawa Girl Guides. Their leader thought they would enjoy making some doodling robots. We covered a couple of tables in brown paper and spread out some basic supplies like duct tape and scissors. Without showing them a sample, I handed out cups, markers, motors, batteries, wire and corks and I issued them a challenge. I told them they had everything they needed to make a robot that doodled. At first, they didn't quite believe me. Before we sat down I had shown them how to hook up the wires to the motor and make a circuit with the battery. Now it was time to try it themselves.
Girl Guides are girls in grades 4 - 6. The 113th are the local troop, meaning most of these girls are in school with my sons. It was fun to spend some with them and watch them work. And they did such a great job! I saw lots of great thinking and new ideas.
One girl flipped up the bottom of her cup to make a face:

Another girl took the time to work out some plans on the paper before she began:

As the evening went on, lots of girls began experimenting with what was used to offset the motor. Some girls started using electrical tape. One girl started making something a little more elaborate:

Every robot was unique. And they all doodled. I loved seeing all the different designs they came up with. And I loved hearing this most of all. (Make sure you've got your sound on to hear this!)
Back with @churchill209
Remember the Rainbow Eggheads? I first visited with them back in December. I had a chance to visit with them again at the end of February. Their teacher, Shauna Pollock, asked if I could come up with something that combined the Grade 5 science topic, states of matter, with the Grade 6 science topic of electricity. What we decided on was a project that combined questions on the states of matter with the quiz card project that I've worked on before. I'm going to let their tweets tell this story:
Getting ready to make our QUIZ CARDS!!! #makerED pic.twitter.com/BcizYAsyRN
— Churchill Room 209 (@churchill209) February 27, 2014
#makerED @maker_junior Alison is now explaining how it lights up! pic.twitter.com/STo21FDKZx
— Churchill Room 209 (@churchill209) February 27, 2014
Everyone is tuned in! pic.twitter.com/s1elfmYFrQ
— Churchill Room 209 (@churchill209) February 27, 2014
Making quiz cards with maker junior.Getting the instructions right now #makered @maker_junior pic.twitter.com/eMtT5zhcif
— Churchill Room 209 (@churchill209) February 27, 2014
@maker_junior #makered learning how to make a light up quiz card pic.twitter.com/itZwP6KS5r
— Churchill Room 209 (@churchill209) February 27, 2014
@maker_junior #makered learning about a book safe and conductive paint and thread.Wanting to do more pic.twitter.com/BRcAAhUM2a
— Churchill Room 209 (@churchill209) February 27, 2014
And we're off pic.twitter.com/BmWuEdtal5
— Churchill Room 209 (@churchill209) February 27, 2014
Starting is the best part! pic.twitter.com/IcUigSb1nZ
— Churchill Room 209 (@churchill209) February 27, 2014
#makered @maker_junior almost done,putting on the conductive thread pic.twitter.com/HdViqyaWJG
— Churchill Room 209 (@churchill209) February 27, 2014
#makerED @maker_junior almost done pic.twitter.com/K4DlMmTnMR
— Churchill Room 209 (@churchill209) February 27, 2014
adding the finishing touches pic.twitter.com/om6Dkzu6gv
— Churchill Room 209 (@churchill209) February 27, 2014
and we're almost done pic.twitter.com/WdyBkyQDtg
— Churchill Room 209 (@churchill209) February 27, 2014
finished!Thank you@maker_junior we'll always want to do it again #makerED pic.twitter.com/4NQBWw7aWg
— Churchill Room 209 (@churchill209) February 27, 2014
#makerED pic.twitter.com/kpiORBG2eu
— Churchill Room 209 (@churchill209) February 27, 2014
#makerED pic.twitter.com/XIy0n3I18H
— Churchill Room 209 (@churchill209) February 27, 2014
Now, did they like it? Everyday this class blogs about "What Stuck With Us Today". There are lots of comments about this activity in their daily blog post:
Blogged: What Stuck With Us Today (Ss fill this out daily on Google forms) http://t.co/X2KqmrQEXY @churchill209 @maker_junior — Shauna Pollock (@misspollock) February 28, 2014
And hey, Shauna liked it too!
Alison from @maker_junior blows us away as always! Today we are making Quiz Cards AND she showed us her smart watch! pic.twitter.com/PAIollcBfa — Shauna Pollock (@misspollock) February 27, 2014
What stuck with me? This class is great. It can be frustrating working with new tools - but they asked questions and stuck with it until everybody got their quiz card working. There were kids helping other kids - I like that. And there was lots of curiosity and wanting to do more. Like, how do I hook up a red LED too? (I still owe them an answer on that one!) And just like last time, they are inspiring me with their social media skills. Thanks, @churchill209, it is always great to spend time with you!
Buffalo Mini Maker Faire
Last weekend the boys and I were happy to participate in the inaugural Buffalo Mini Maker Faire. We met the organizer in NYC at the 2013 World Maker Faire and he had mentioned it then. Buffalo is not too far from Ottawa and we've got family there, so it was a great opportunity to connect with a new community of makers.
And there were lots of makers there! The Buffalo Museum of Science has four floors of exhibit space and there were makers on every floor. We were in the Sparks! Workshop on the third floor with the Elmwood Franklin School Maker Club and the super cool Aidan 3 and his 3D printer demo. Just down the hall the Buffalo Lab was holding a soldering workshop with these great "I Can Solder" badges. Destination Imagination had all sorts of stuff going on - it was the first time I'd heard about this great program and was happy to hear it was global!

The boys and I were demonstrating the doodling robots and making electro-cards with the kids that came by. I didn't get too much time away from the booth. But I did manage to pick up a Buffalo sweatshirt from Mad Jack Productions (t-shirts and 3D printing - how cool is that?), see where all the packets of salt scrub were being made at Azariah's Innocence , marvel at the cardboard pirate ship and almost shook hands with Chewbacca . I was happy to see everyone busy and wearing their safety glasses at Take It Apart . And I was very excited to see the exhibits at the Young Makers section in the lobby on the first floor. Keep making!

There certainly appears to be a thriving community of makers in Buffalo. Judging from the jam-packed parking lots and hallways there is a lot interest, too! I was sorry to have to miss the after-party being held at The Foundry. It looks like a great place. A lot of the makers at the faire work out of there. Community is so important to making.
Also thanks to the Western New York Book Arts Center. They gave each maker a print as a thank you for participating. They also gave prints at the World Maker Faire. These pieces are really beautiful. Thank you! Wish I was in town for the Edible Book Festival on March 30th, 2014 - it looks like a unique event.
Create: Use what you know to make something new
 My son is a maker. We knew this from an early age. He has always had good fine motor control and loved to work with his hands. When he was younger, he enjoyed traditional arts and crafts activities. He knits, sews, weaves, and needle felts but never uses a pattern. I think that's what inspires me most about his work - if he wants to knit a dog, he just knits one. He know how to read a pattern now, but he finds it awkward and slow to try and figure out what someone else wants him to do. ...
View full article →
My son is a maker. We knew this from an early age. He has always had good fine motor control and loved to work with his hands. When he was younger, he enjoyed traditional arts and crafts activities. He knits, sews, weaves, and needle felts but never uses a pattern. I think that's what inspires me most about his work - if he wants to knit a dog, he just knits one. He know how to read a pattern now, but he finds it awkward and slow to try and figure out what someone else wants him to do. ...
View full article →
Do you like pizza?

I've been making a lot of Quiz Cards lately. I ran two workshops last week where we made them. It's a simple project. I use tabbed coin cell batteries, LEDs, and foam core. To connect the components and make the circuits I've been using brass paper fasteners and conductive thread. It's a bit tricky to "see" the circuit for beginners because it covers both the front and back of the board. But it doesn't take long to explore and discover that you can change the "right" answer, you can add more answers, or you can even make all the answers light up!... Continue Reading
View full article →Inspiration at the Smithsonian
Over the winter break we had an adventure. Winter started early here and we wanted to escape for a bit. Airfare was daunting so we pulled out the map and asked ourselves, how far south could we drive in one day? And that is how we ended up in Washington D.C.
D.C. is the perfect vacation place for my family. Pedestrian friendly, warmer weather than home, and no snow made for long days spent outside exploring. We were 15 minutes from the National Zoo and enjoyed their Zoo Lights program. The Friends of the National Zoo volunteers were fantastic and wonderfully patient answering all of our questions. It took us three visits to the zoo see everything we wanted to see. In the Invertebrate House I was fascinated by these comb jellies. They reminded me of some of my favourite LED projects but they don't light up. The changing colour you see is light refracted from tiny hairs that are moving. So graceful and elegant.
At the National Air and Space Museum, we all touched a piece of the moon.

As we toured through the National Air and Space Museum and the Museum of American History I was inspired by the stories of three different makers. The first makers that caught my attention were brothers Wilbur and Orville Wright. The exhibit did a great job of describing Wilbur and Orville's different characters and unconventional educational paths. Orville took things apart as a child and loved to create. Wilbur was more interested in books and academics. Both were continually learning. They were bicycle mechanics. Looking at the restored Wright Flyer that anchored the exhibit, I could see the chain and spoke mechanics that came out of their bike shop.

The second maker was the famous inventor Thomas Edison, who was quoted by his private secretary, A. O. Tate as saying "Well, I'm not a scientist, I'm an inventor." I liked the way the exhibit was organized. Starting with the preconditions for invention, it then walked you through the inventive process, the importance of promotion, how success brings competition and the consequences of an important invention. I love any glimpses I can get into how someone works and I was excited to see Edison's quote from his 1880 testimony "In 1877 ... I commenced the practice of placing notebooks all over my laboratory." I have always been an obsessive note taker, I wonder what happened to convince Edison to leave them in multiple places?
But my favourite exhibit, by far, took me completely by surprise. In the Museum of American History they had completely recreated the workshop of a famous televised maker. I was taken away by the functionality and practicality of the space. Tools were lovingly displayed on pegboard and larger appliances were given dedicated counter space. It was Julia Child's kitchen! I had never thought of my kitchen as a workshop, even though I spend a lot of time each day making food for my family. But Julia Child's kitchen was so obviously a workshop I was inspired. I love workshops, now I just have to figure out how to love my kitchen.
