- Continue Shopping
- Your Cart is Empty
Buffalo Mini Maker Faire
Last weekend the boys and I were happy to participate in the inaugural Buffalo Mini Maker Faire. We met the organizer in NYC at the 2013 World Maker Faire and he had mentioned it then. Buffalo is not too far from Ottawa and we've got family there, so it was a great opportunity to connect with a new community of makers.
And there were lots of makers there! The Buffalo Museum of Science has four floors of exhibit space and there were makers on every floor. We were in the Sparks! Workshop on the third floor with the Elmwood Franklin School Maker Club and the super cool Aidan 3 and his 3D printer demo. Just down the hall the Buffalo Lab was holding a soldering workshop with these great "I Can Solder" badges. Destination Imagination had all sorts of stuff going on - it was the first time I'd heard about this great program and was happy to hear it was global!

The boys and I were demonstrating the doodling robots and making electro-cards with the kids that came by. I didn't get too much time away from the booth. But I did manage to pick up a Buffalo sweatshirt from Mad Jack Productions (t-shirts and 3D printing - how cool is that?), see where all the packets of salt scrub were being made at Azariah's Innocence , marvel at the cardboard pirate ship and almost shook hands with Chewbacca . I was happy to see everyone busy and wearing their safety glasses at Take It Apart . And I was very excited to see the exhibits at the Young Makers section in the lobby on the first floor. Keep making!

There certainly appears to be a thriving community of makers in Buffalo. Judging from the jam-packed parking lots and hallways there is a lot interest, too! I was sorry to have to miss the after-party being held at The Foundry. It looks like a great place. A lot of the makers at the faire work out of there. Community is so important to making.
Also thanks to the Western New York Book Arts Center. They gave each maker a print as a thank you for participating. They also gave prints at the World Maker Faire. These pieces are really beautiful. Thank you! Wish I was in town for the Edible Book Festival on March 30th, 2014 - it looks like a unique event.
Create: Use what you know to make something new
 My son is a maker. We knew this from an early age. He has always had good fine motor control and loved to work with his hands. When he was younger, he enjoyed traditional arts and crafts activities. He knits, sews, weaves, and needle felts but never uses a pattern. I think that's what inspires me most about his work - if he wants to knit a dog, he just knits one. He know how to read a pattern now, but he finds it awkward and slow to try and figure out what someone else wants him to do. ...
View full article →
My son is a maker. We knew this from an early age. He has always had good fine motor control and loved to work with his hands. When he was younger, he enjoyed traditional arts and crafts activities. He knits, sews, weaves, and needle felts but never uses a pattern. I think that's what inspires me most about his work - if he wants to knit a dog, he just knits one. He know how to read a pattern now, but he finds it awkward and slow to try and figure out what someone else wants him to do. ...
View full article →
Buffalo Mini Maker Faire - March 1st
 We're happy to announce that we will be attending the first ever Buffalo Mini Maker Faire at the Buffalo Museum of Science on March 1st. Make sure to stop by our booth and say hello! We're be sure to have some cool projects on the go.
Hamboree Mini Maker Faire 2014
Earlier this month we were visiting with family down in South Florida. While we were there we took the opportunity to set up at the Hamboree Mini Maker Faire. This was the first year for the Hamboree Mini Maker Faire but the 47th year for the Hamboree! I was excited when I found out they were combining a maker faire with a ham radio convention. We're not Hams but are big fans of the community.
A "Ham" is an amateur radio operator. Amateur Radio has been around for a long time. To transmit as an operator, you need to pass a licensing exam and receive a call sign. Hams often build and maintain their own equipment. Many electrical engineers got their start as kids building radios and becoming licensed. Hams and makers have a lot in common. Ham radio conventions are great places to find stuff. Old electronics. Inventions. Tools. Radios. Test equipment. They are great places to browse and find some good deals. As a maker, I enjoy attending a ham radio convention so I was excited about having a combined Hamboree and Mini Maker Faire.
The Mini Maker Faire was on the Saturday. There were a small number of makers attending, it's just the first year. There was a VEX IQ Challenge robotics competition that brought in a lot of kids and their families from area schools. We set up a booth where we showed some sample projects, photos of artwork that kids in our workshops have done, and made electro-cards with many of the kids attending the event.
Terry and Mary Alice were there with Yourduino. They had a couple of neat projects set up to show what you can do. Mary Alice gave my son a starter kit that he's had a lot of fun with - more on that later!

We were mesmerized by Artisan Kelan's steampunk creations. The kids attending the robotics competition loved his work and touched everything. I was impressed with his patience.

We also had a chance to play with a MaKey MaKey with Vincent. Always fun. We particularly enjoyed the Munching Banana Keyboard.
Round that off with with telescopes from the Southern Cross Astronomical Society and more robots from StarBot , it was a great show. Thanks to the organizers for pulling it together, I am looking forward to seeing it grow!
Do you like pizza?

I've been making a lot of Quiz Cards lately. I ran two workshops last week where we made them. It's a simple project. I use tabbed coin cell batteries, LEDs, and foam core. To connect the components and make the circuits I've been using brass paper fasteners and conductive thread. It's a bit tricky to "see" the circuit for beginners because it covers both the front and back of the board. But it doesn't take long to explore and discover that you can change the "right" answer, you can add more answers, or you can even make all the answers light up!... Continue Reading
View full article →Inspiration at the Smithsonian
Over the winter break we had an adventure. Winter started early here and we wanted to escape for a bit. Airfare was daunting so we pulled out the map and asked ourselves, how far south could we drive in one day? And that is how we ended up in Washington D.C.
D.C. is the perfect vacation place for my family. Pedestrian friendly, warmer weather than home, and no snow made for long days spent outside exploring. We were 15 minutes from the National Zoo and enjoyed their Zoo Lights program. The Friends of the National Zoo volunteers were fantastic and wonderfully patient answering all of our questions. It took us three visits to the zoo see everything we wanted to see. In the Invertebrate House I was fascinated by these comb jellies. They reminded me of some of my favourite LED projects but they don't light up. The changing colour you see is light refracted from tiny hairs that are moving. So graceful and elegant.
At the National Air and Space Museum, we all touched a piece of the moon.

As we toured through the National Air and Space Museum and the Museum of American History I was inspired by the stories of three different makers. The first makers that caught my attention were brothers Wilbur and Orville Wright. The exhibit did a great job of describing Wilbur and Orville's different characters and unconventional educational paths. Orville took things apart as a child and loved to create. Wilbur was more interested in books and academics. Both were continually learning. They were bicycle mechanics. Looking at the restored Wright Flyer that anchored the exhibit, I could see the chain and spoke mechanics that came out of their bike shop.

The second maker was the famous inventor Thomas Edison, who was quoted by his private secretary, A. O. Tate as saying "Well, I'm not a scientist, I'm an inventor." I liked the way the exhibit was organized. Starting with the preconditions for invention, it then walked you through the inventive process, the importance of promotion, how success brings competition and the consequences of an important invention. I love any glimpses I can get into how someone works and I was excited to see Edison's quote from his 1880 testimony "In 1877 ... I commenced the practice of placing notebooks all over my laboratory." I have always been an obsessive note taker, I wonder what happened to convince Edison to leave them in multiple places?
But my favourite exhibit, by far, took me completely by surprise. In the Museum of American History they had completely recreated the workshop of a famous televised maker. I was taken away by the functionality and practicality of the space. Tools were lovingly displayed on pegboard and larger appliances were given dedicated counter space. It was Julia Child's kitchen! I had never thought of my kitchen as a workshop, even though I spend a lot of time each day making food for my family. But Julia Child's kitchen was so obviously a workshop I was inspired. I love workshops, now I just have to figure out how to love my kitchen.

Maker Club
I had a great time last term helping with some school-based Maker Club's around town.
Dunlop PS sold t-Shirts to bring me in for a fully facilitated club. That means I led the club members through complete projects and supplied all the materials. There was a Primary Club for grades 1, 2 and 3 and a Junior Club for grades 4, 5, 6. Each club was held over a 25 minute recess so we generally did one project over two weeks. A lot of prep went in to making sure the kids spent most of their time working with the project and not waiting for components or instruction. We had 18 students in the Primary Club and 25 students in the Junior Club. We were successful working with such large groups because of the wonderful parent and teacher volunteers who came in to help! With the volunteers we were able to have the students work in small groups so they had help on hand to answer questions and didn't have to wait for me to make it to the table.
We all had a lot of fun. We learnt some new skills and worked with new tools. Some kids found some new areas of expertise that they were able to help others with. The Primary Club and Junior Club worked on similar projects with either different components or different levels of prep by me before the club began. Here is some of their work:

I have also been volunteering with the Maker Club at my son's school, JH Putman PS . My son just started here this year. JH Putman is a middle school that has a lot of extracurricular activities that are run by staff, students and volunteers. This year, JH Putman has started transforming their old darkroom into a makerspace and I have volunteered to come and supervise the makerspace once a week. When we started out the year we had some computers and a handful of MakeyMakey's and we were waiting for more equipment to come. My son convinced a few of friends to come join him in the makerspace and we started playing with the MakeyMakey's. Some of the older kids already had a cool game controller going, but I needed something to get the new grade 6 kids involved. I brought in a few different project ideas from Make that involved hooking the MakeyMakey up to Scratch. They spent a week or two modifying the "Door Knocker of Doom" to work with a foot pedal. And then I left them this:

I fully admit that by this point I was experimenting with how little information I could give them and have them get a project to work. And by the time I came back the week after, we had this:

It's not hooked up to the MakeyMakey in this photo - but they had it hooked up and working. We experimented with adding new notes. I love it. Since then, we've had a fantastic donation of equipment to the makerspace and they are interested in learning how to solder and, of course, de-solder. I can't wait to see where this group heads this year.
Maker Junior visits @churchill209
Have you met the Rainbow Eggheads yet? They are a grade 5/6 class at Churchill Alternative PS who are very comfortable working with technology. They have a blog where they write about their learning adventures. And they tweet as a class from @churchill209 . I met their teacher, Shauna Pollack, at Ottawa EdCamp 2013, and we set up a visit to their classroom to make Electro-cards . Electro-cards are light-up greeting cards made with a battery, LED, construction paper switch and conductive paint.
Big and little buddies have started building their circuit cards! #makerjunior
— Churchill Room 209 (@churchill209) December 12, 2013
The class works closely with a Grade 1/2 class down the hall. Each student is paired with buddy. I visited the class over 2 days to give everyone a chance to make a card.
#makerjunior pic.twitter.com/lwWijFjjQR
— Churchill Room 209 (@churchill209) December 12, 2013
First we covered some basics - batteries, simple circuits, open vs. closed circuits (ie. switches), and positive to negative electron flow. We started by making sure we could each light up an LED with a battery.
We are doing #makerjunior this is so fun — Churchill Room 209 (@churchill209) December 12, 2013
Everyone was give a card with a very basic schematic on it. Their card designs all took advantage of the light. I enjoyed the creativity of the designs that were created!
Cool, it lights up!! #makerjr #makerjunior pic.twitter.com/dbdGjd1YMG — Churchill Room 209 (@churchill209) December 13, 2013
As the cards were drying, I set out some of the other projects I work with. They were well received.
#makerjunior this lights up cool hunh pic.twitter.com/GC293upsHW — Churchill Room 209 (@churchill209) December 12, 2013
#makerjunior this is the best !!!!!!!!!!!!!!!!!!!!!!!!!!!! pic.twitter.com/3Bh0JsO2Ec — Churchill Room 209 (@churchill209) December 12, 2013
The Rainbow Eggheads and their little buddies were great to work with. It was fun helping them build their cards. And when I was able to check the twitter feed after the event, I felt good knowing that they had enjoyed themselves.
So thank you, @churchill209, I had a good time too!
Inventors' Workshop
I am very excited about the Inventors' Workshop I'm leading this winter with the Glebe Neighbourhood Activies Group (GNAG). The workshop will be held Winter 2014, Mondays from 4:00 – 5:15pm from Jan 6 to March 17. It's a nine-week workshop where we will be learning about some different technical tools, creating several different projects, and working on our own inventions!
The workshop starts off with exploring motors and movement, looking at different motors and how we can get our creations to "move".
In the following weeks we'll look at basic circuits and some alternative materials, like conductive paint and conductive thread, to make greeting cards and quiz games that light up using LEDs and batteries.

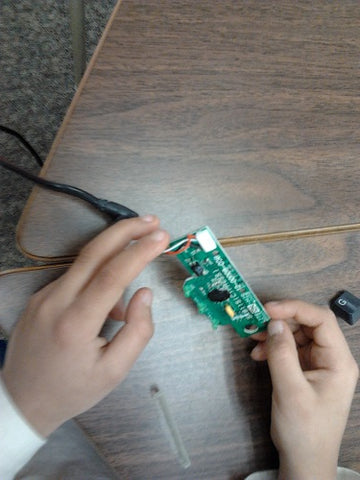
Then we'll take apart some consumer electronics to see what's going on inside.

We're going to explore PCB's a little more closely. We're even going to learn how to solder.

Throughout the workshop, we'll be writing down ideas in our Inventors' Notebooks. In the last couple of weeks, each student will be working on their own inventions based on the projects we have previously worked on.
If you have any questions, please don't hesitate to contact me! Registration opens December 12.
Break and Make Workshop
One of my favourite workshops is the Break and Make. The title here explains it all. First, we "break". We put our safety glasses on, I hand out some basic consumer electronics, and away we go.
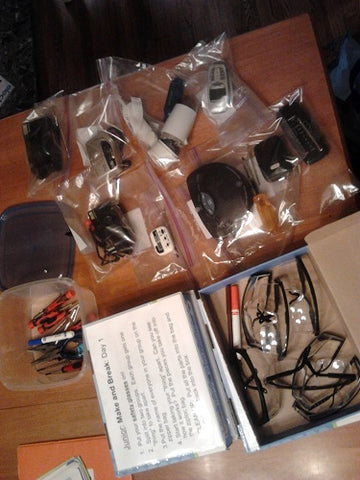
A successful Break and Make requires some prep work ahead of time. Before the workshop starts I take the time to:
- Look at every item we're going to "break" and make sure the screws will turn
- Cut off power cords and remove any batteries
- Start anything that needs to be pried open or needs special tools
- Package each item with the screwdriver they will need to get started
My goal is for the kids to be successful as they start to take things apart. I always pack a box of extra tools they'll need as they work their way in, but I make sure they can get started right away.
Safety first! Safety glasses go on before the packages are handed out. And safety glasses must stay on! It's hard to resist "prying" and those eyes need to be covered! Even if they are wearing glasses, safety glasses are a must. You'll feel much better when those keys start flying off the keyboards.
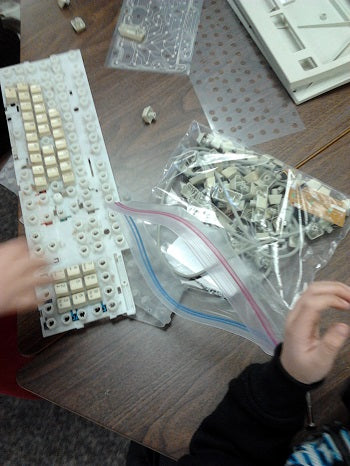
Good items to take apart are ones you use every day. Radios. Hair dryers. Keyboards are easy and very satisfying for the younger kids. Some electronics are not safe to take apart – TV's, monitors, anything that could shatter or hold a charge. As the kids are working, stop by and talk about what they're seeing. Ask questions – what could this do? What is this for?
Some kids will need encouragement to keep going. Some kids will be worried about "breaking" the item beyond repair. Others will take the "breaking" very literally. No – I don't take hammers to a Break and Make! Be prepared to step in and help when screws are tight or difficult to find.
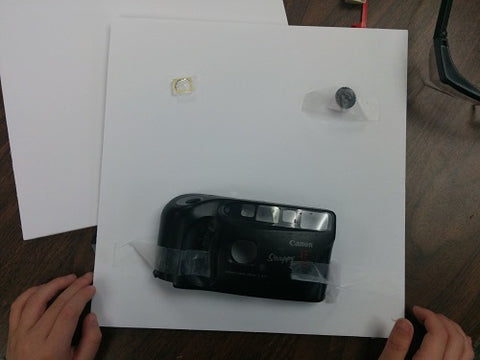
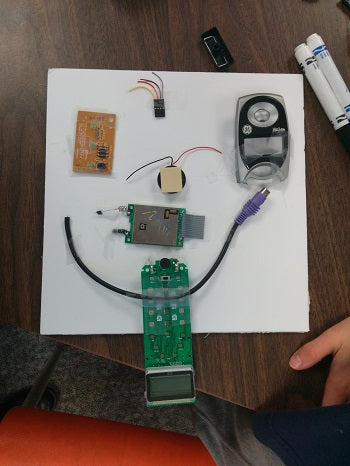
Once we get everything mostly apart, it's time to start the art. I hand out pieces of foam core. I usually cut a full size poster board into smaller pieces. Heavy cardboard works too. You need something stiff to hold the heavier pieces and a lot of the pieces can actually be poked through the board.

The usual craft supplies are important – tape, markers, scissors, glue. I always take a couple of different types of glue and a hot glue gun. Tape and a glue stick will work for the majority of the artwork, but hot glue will stick a heavier item down without an extended dry time.
Resist the temptation to remove safety glasses! If someone is still taking apart or cutting, everyone needs to be wearing safety glasses.
Have fun! This is about exploration and play with learning along the way. It's okay if something breaks, that's the point.
Thanks to the Dunlop PS Primary Maker Club for the great art!